OpenShift MCP Server Test Drive

I want to explore the capability of the OpenShift MCP server. My first use case is to run the OpenShift MCP server and integrate with Claude. Then, I will explore how to configure OpenShift Lightspeed to use the OpenShift MCP server with Claude as the LLM model next.

Deploy OpenShift MCP Server

Prerequistes:

  • OpenShift 4.22 cluster
  • oc logged in as a user who has cluster-admin permission
  • Helm 3.x
  • Pull access to registry.redhat.io
  • An MCP client (Cursor or Claude Code, for example)

Step 1: Add OpenShift Helm Repo

Output from the terminal:

$ helm repo add openshift-helm-charts https://charts.openshift.io/
"openshift-helm-charts" has been added to your repositories
$ helm repo update
Hang tight while we grab the latest from your chart repositories...
...Successfully got an update from the "openshift-helm-charts" chart repository
...Successfully got an update from the "advanced-workflows" chart repository
...Successfully got an update from the "rh-ecosystem-edge" chart repository
...Successfully got an update from the "stackrox" chart repository
...Successfully got an update from the "rhacs" chart repository
...Successfully got an update from the "stable" chart repository
...Successfully got an update from the "airbyte" chart repository
Update Complete. ⎈Happy Helming!⎈
$ helm search repo redhat-openshift-mcp-server
NAME CHART VERSION APP VERSION DESCRIPTION
openshift-helm-charts/redhat-openshift-mcp-server 0.3.0 latest Helm Chart for MCP server for Red Hat OpenShift

Step 2: Define the MCP server hostname for ingress access

$ APPS_DOMAIN=$(oc get ingresses.config.openshift.io cluster -o jsonpath='{.spec.domain}')
$ echo "mcp-server.${APPS_DOMAIN}"

Step 3: Install the OpenShift MCP server with full access (you can set read-only access optionally)

  • Recommended for most cases — binds the chart ServiceAccount to the built-in view ClusterRole.
  • Full cluster access (only if you intentionally want write/admin capabilities)
  • Defaults are already core + config in read-only mode. Other toolsets from the 4.22 docs include netedgehelmmetricsossmkubevirttekton.
  • Run the command below in your terminal
$ helm upgrade -i -n openshift-mcp-server --create-namespace openshift-mcp-server \
openshift-helm-charts/redhat-openshift-mcp-server \
--set openshift=true \
--set ingress.host=mcp-server.${APPS_DOMAIN} \
--set-json 'config.toolsets=["core","config","kubevirt","metrics"]' \
--set-json 'rbac.extraClusterRoleBindings=[{"name":"admin-access","roleRef":{"name":"cluster-admin","external":true}}]'

Note: Available toolsets: config, core, helm, kcp, kubevirt, metrics, netedge, openshift, ossm, tekton. Defaults to core, config.

Output from terminal:

$
helm upgrade -i -n openshift-mcp-server --create-namespace openshift-mcp-server \
openshift-helm-charts/redhat-openshift-mcp-server \
--set openshift=true \
--set ingress.host=mcp-server.${APPS_DOMAIN} \
--set-json 'config.toolsets=["core","config","kubevirt","metrics"]' \
--set-json 'rbac.extraClusterRoleBindings=[{"name":"admin-access","roleRef":{"name":"cluster-admin","external":true}}]'
Release "openshift-mcp-server" does not exist. Installing it now.
NAME: openshift-mcp-server
LAST DEPLOYED: Wed Jul 29 14:15:00 2026
NAMESPACE: openshift-mcp-server
STATUS: deployed
REVISION: 1
NOTES:
Thank you for installing redhat-openshift-mcp-server 0.3.0.

MCP server for Red Hat OpenShift has been deployed successfully.

For more information, visit: https://github.com/openshift/openshift-mcp-server

Step 4: Verify the deployment

$ oc get pods,svc,route -n openshift-mcp-server                                    
NAME READY STATUS RESTARTS AGE
pod/openshift-mcp-server-redhat-openshift-mcp-server-85578d446xtqj6 1/1 Running 0 10s

NAME TYPE CLUSTER-IP EXTERNAL-IP PORT(S) AGE
service/openshift-mcp-server-redhat-openshift-mcp-server ClusterIP 172.30.223.187 <none> 8080/TCP 4m12s

NAME HOST/PORT PATH SERVICES PORT TERMINATION WILDCARD
route.route.openshift.io/openshift-mcp-server-redhat-openshift-mcp-server-hgpjr mcp-server.apps.demo.sandbox1576.opentlc.com / openshift-mcp-server-redhat-openshift-mcp-server http edge/Redirect None

$ oc logs openshift-mcp-server-redhat-openshift-mcp-server-85578d446xtqj6 --tail=50
I0729 21:19:05.621429 1 http.go:163] "HTTP server starting on port 8080 (endpoints: /mcp, /sse, /message, /healthz, /stats, /metrics)"

Get the route URL:

$ oc get route -n openshift-mcp-server -o jsonpath='{.items[0].spec.host}{"\n"}'

mcp-server.apps.demo.sandbox1576.opentlc.com

Step 5: Connect my OpenShift MCP server with Claude code

Create a .mcp.json file similar to the one shown below

{
"mcpServers": {
"openshift": {
"type": "http",
"url": "https://mcp-server.apps.demo.sandbox1576.opentlc.com/mcp"
}
}
}

Smoke test from a terminal:

$ curl -k -sS -o /dev/null -w "%{http_code}\n" \
"https://mcp-server.${APPS_DOMAIN}/healthz"
200

Integrate OpenShift MCP Server with Claude Code

Step 1: Run the following command to add a kubeconfig token for cluster access.

$ claude mcp add --transport stdio --env KUBECONFIG=$HOME/.kube/config openshift -- npx openshift-mcp@latest            

Thought for 3s (ctrl+o to expand)

⏺ That command looks correct now. After running it, verify the server connected:

claude mcp list

You should see openshift listed with a ✔ Connected status. If it connects successfully, restart your Claude Code
session and the OpenShift MCP tools will be available automatically.

If it fails to connect, try running the server command directly to see any errors:

npx openshift-mcp@latest

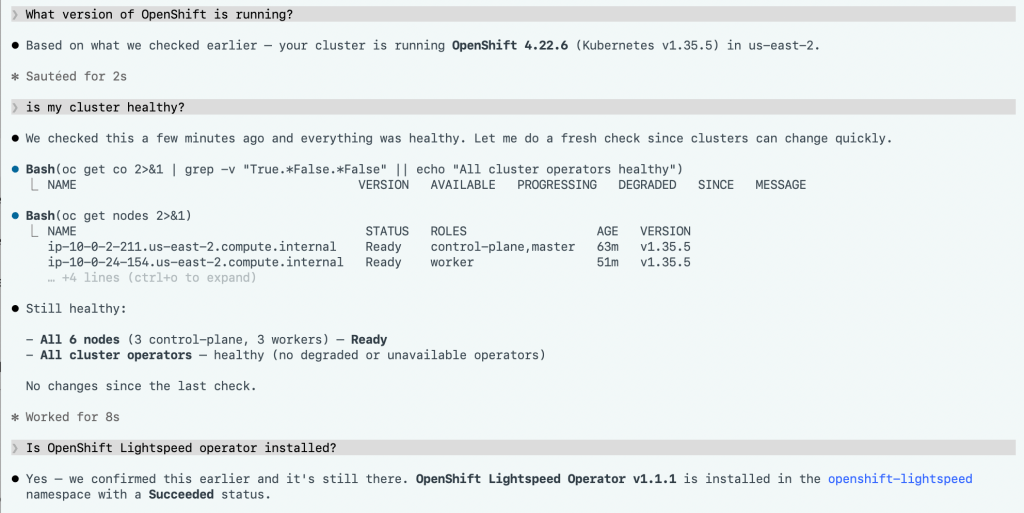
Step 2: Let’s test out the Claude code and OpenShift MCP integration.
Setting up OpenShift LightSpeed to use OpenShift MCP server

Step 1: Create a GCP service account JSON key file

  • Go to GCP Console and create a project
  • Enable billing on that project
  • Enable the Vertex AI API
  • Go to IAM & Admin —> Server Accounts —> Create server account
  • Grant at least Vertex AI User (roles/aiplatform.user
  • Go to service account —> Keys tab
  • Add key —> create new key —> JSON —> create
  • Download the JSON key file locally.

Step 2: Create a secret with the JSON key file as shown below

$ oc create secret generic llmcreds --from-file=gcp-service-account.json=/Users/shannachan/projects/gcloud/mytest-xxxxxx.json -n openshift-lightspeed

secret/llmcreds created

Step 3: Create an OLSConfig CR file that has “mcpServers” as part of the configuration shown below. In th case of OpenShift LightSpeed, you will also has at least one LLM provider configured.

spec:
featureGates:
- MCPServer
mcpServers:
- headers:
- name: Authorization
valueFrom:
type: kubernetes
name: openshift-mcp-server
timeout: 30
url: 'http://openshift-mcp-server.openshift-mcp-server.svc.cluster.local:8080/mcp'
llm:
providers:
- credentialKey: gcp-service-account.json
credentialsSecretRef:
name: llmcreds
googleVertexAnthropicConfig:
location: us-east5
projectID: mytest-xxxxx
models:
- name: claude-sonnet-4-5
name: google-anthropic
type: google_vertex_anthropic
ols:
defaultModel: claude-sonnet-4-5
defaultProvider: google-anthropic

References:

OpenShift MCP Server User Guide

OpenShift Documentation

OpenShift Lightspeed documentation

OpenShift Agent Installer on bare metal in a restricted environment

My goal for this post is to share my steps for installing OpenShift using Agent Installer in a restricted environment using a mirror registry.

My limitation is that my hardware is ancient 🙂 I used ESXi to simulate the bare metal hosts, but did not use vSphere as the provider for the installation.

My condition for this test:

  • I can only use static IP addresses (no DHCP).
  • RHEL 9 is the provision server with installed nmstatectl, oc CLI, oc mirror, and mirror registry.
  • I used Agent Installer to install 4.16.39, a three-node compact cluster.

High-level preparation steps:

  1. Set up the DNS
  2. Create a cert for the mirror registry
  3. Install mirror registry
  4. Update CA trust on the provision host
  5. Mirror the image from the source (quay.io)
  6. Create agent-config.yaml and install-config.yaml
    • agent-config.yaml must define the NTP servers (of your choice)
    • install-config.yaml’s pullSecret must include the mirror registry credential and the cert for the mirror registry.

Download links

My example DNS configuration

Install mirror registry

I used the Red Hat mirror registry (Quay). You can also mirror the images using Nexus, Jfrog, or Harbor. Please use the Reference [4] to generate certs.
Run the following command to install the mirror registry.

$ ./mirror-registry -v install --quayHostname bastion.example.com --quayRoot /opt/ocpmirror --initUser admin --initPassword admin123456 --quayStorage /opt/mirrorStorage --sslCert ssl.cert --sslKey ssl.key

Mirror the images

To mirror images using plugin v2, you must have downloaded the ‘oc’ and ‘oc mirror’ plug-ins.

Download pullSecret.txt and update the credentials for your environment.

Please use reference [2] to configure the pullSecret.json. The following commands can be used to validate the pullSecret file.

$podman login --authfile local.json -u $QUAY_USER -p $QUAY_PWD $QUAY_HOST_NAME:$QUAY_PORT --tls-verify=false

$jq -cM -s '{"auths": ( .[0].auths + .[1].auths ) }' local.json ~/pull-secret.txt > pull-secret.json

$podman login --authfile ./pull-secret.json quay.io
$podman login --authfile ./pull-secret.json registry.redhat.io
$podman login --authfile ./pull-secret.json $QUAY_HOST_NAME:$QUAY_PORT

My example imageSetConfiguration file

Run the following command to mirror the images to the mirror registry.

$ oc mirror --config imageSetConfiguration-v2-4.16.39.yaml --authfile /root/mirror-reg/pull-secret.json --workspace file:///opt/working-dir docker://bastion.example.com:8443/ocp4 --v2

Output from the ‘oc mirror’

Configuration files for the installation

  • agent-config.yaml
  • install-config.yaml

My example agent-config.yaml

apiVersion: v1beta1
kind: AgentConfig
metadata:
name: demo
additionalNTPSources:
- time1.google.com
- time2.google.com
rendezvousIP: 192.168.1.121
hosts:
- hostname: max1.ocp.example.com
rootDeviceHints:
deviceName: /dev/sda
interfaces:
- name: ens160
macAddress: 00:0c:29:5e:fe:f3
networkConfig:
interfaces:
- name: ens160
type: ethernet
state: up
mac-address: 00:0c:29:5e:fe:f3
ipv4:
enabled: true
address:
- ip: 192.168.1.121
prefix-length: 23
dhcp: false
dns-resolver:
config:
server:
- 192.168.1.188
routes:
config:
- destination: 0.0.0.0/0
next-hop-address: 192.168.1.188
next-hop-interface: ens160
table-id: 254
- hostname: max2.ocp.example.com
rootDeviceHints:
deviceName: /dev/sda
interfaces:
- name: ens160
macAddress: 00:0c:29:a7:4d:e0
networkConfig:
interfaces:
- name: ens160
type: ethernet
state: up
mac-address: 00:0c:29:a7:4d:e0
ipv4:
enabled: true
address:
- ip: 192.168.1.122
prefix-length: 23
dhcp: false
dns-resolver:
config:
server:
- 192.168.1.188
routes:
config:
- destination: 0.0.0.0/0
next-hop-address: 192.168.1.188
next-hop-interface: ens160
table-id: 254
- hostname: max3.ocp.example.com
rootDeviceHints:
deviceName: /dev/sda
interfaces:
- name: ens160
macAddress: 00:0c:29:59:2e:10
networkConfig:
interfaces:
- name: ens160
type: ethernet
state: up
mac-address: 00:0c:29:59:2e:10
ipv4:
enabled: true
address:
- ip: 192.168.1.123
prefix-length: 23
dhcp: false
dns-resolver:
config:
server:
- 192.168.1.188
routes:
config:
- destination: 0.0.0.0/0
next-hop-address: 192.168.1.188
next-hop-interface: ens160
table-id: 254

My example of install-config.yaml

apiVersion: v1
baseDomain: ocp.example.com
compute:
- name: worker
replicas: 0
controlPlane:
name: master
replicas: 3
metadata:
name: demo
networking:
clusterNetwork:
- cidr: 10.128.0.0/14
hostPrefix: 23
machineNetwork:
- cidr: 192.168.0.0/23
networkType: OVNKubernetes
serviceNetwork:
- 172.30.0.0/16
platform:
baremetal:
hosts:
- name: max1.ocp.example.com
role: master
bootMACAddress: 00:0c:29:5e:fe:f3
- name: max2.ocp.example.com
role: master
bootMACAddress: 00:0c:29:a7:4d:e0
- name: max3.ocp.example.com
role: master
bootMACAddress: 00:0c:29:59:2e:10
apiVIPs:
- 192.168.1.126
ingressVIPs:
- 192.168.1.125
fips: false
pullSecret: '{"auths":{"..."}}}'
sshKey: 'ssh-rsa … root@bastion.example.com'
imageContentSources:
- mirrors:
- bastion.example.com:8443/ocp4/openshift/release-images
source: quay.io/openshift-release-dev/ocp-release
- mirrors:
- bastion.example.com:8443/ocp4/openshift/release
source: quay.io/openshift-release-dev/ocp-v4.0-art-dev
additionalTrustBundle: |
-----BEGIN CERTIFICATE-----

-----END CERTIFICATE-----

Steps that I took before booting up the hosts

  1. I created VMs (bare metal hosts) on my ESXi host. Because I am using an ESXi host, I can get the MAC addresses from the UI.
  2. Add the MAC addresses to the agent-install.yaml
  3. Make a directory. I use ‘demo’ in my example here.
  4. Copy agent-config.yaml and install-config.yaml to the demo directory.
  5. Run the following command to create the ISO from the parent of the demo directory. The command will output agent.x86_64.iso to the demo directory.
$ openshift-install --dir demo agent create image

Now you have to ISO to boot all the hosts

  1. Upload the ISO to the ESXi datastore
  2. Configure all bare metal hosts (VM in my case) to boot with the agent.x86_64.iso
  3. Boot all three hosts in sequence and run the command below.
$./openshift-install --dir demo agent wait-for bootstrap-complete  --log-level=info

You will monitor the status of the bootstrap from the output. (It took a while to complete, as you can see)

[root@bastion ~]# ./openshift-install --dir demo agent create image
WARNING imageContentSources is deprecated, please use ImageDigestSources
INFO Configuration has 3 master replicas and 0 worker replicas
WARNING hosts from install-config.yaml are ignored
WARNING The imageDigestSources configuration in install-config.yaml should have at least one source field matching the releaseImage value bastion.example.com:8443/ocp4/openshift/release-images@sha256:2754cd66072e633063b6bf26446978102f27dd19d4668b20df2c7553ef9ee4cf
WARNING Certificate 2020B78FC3BA75A644FD58F757EFAE86C81FA384 from additionalTrustBundle is x509 v3 but not a certificate authority
INFO The rendezvous host IP (node0 IP) is 192.168.1.121
INFO Extracting base ISO from release payload
INFO Verifying cached file
INFO Using cached Base ISO /root/.cache/agent/image_cache/coreos-x86_64.iso
INFO Consuming Agent Config from target directory
INFO Consuming Install Config from target directory
INFO Generated ISO at demo/agent.x86_64.iso
[root@bastion ~]# ./openshift-install --dir demo agent wait-for bootstrap-complete --log-level=info
INFO Waiting for cluster install to initialize. Sleeping for 30 seconds
INFO Cluster is not ready for install. Check validations

INFO Host max2.ocp.example.com: calculated role is master
INFO Cluster validation: api vips 192.168.1.126 belongs to the Machine CIDR and is not in use.
INFO Cluster validation: ingress vips 192.168.1.125 belongs to the Machine CIDR and is not in use.
INFO Cluster validation: The cluster has the exact amount of dedicated control plane nodes.
INFO Host 946b4d56-fef7-9683-5b01-6405c8592e10: Successfully registered
WARNING Host max1.ocp.example.com validation: No connectivity to the majority of hosts in the cluster
WARNING Host max3.ocp.example.com validation: No connectivity to the majority of hosts in the cluster
WARNING Host max3.ocp.example.com validation: Host couldn't synchronize with any NTP server
WARNING Host max2.ocp.example.com validation: No connectivity to the majority of hosts in the cluster
INFO Host max2.ocp.example.com: calculated role is master
INFO Host max1.ocp.example.com validation: Host has connectivity to the majority of hosts in the cluster
INFO Host max2.ocp.example.com validation: Host has connectivity to the majority of hosts in the cluster
INFO Host max3.ocp.example.com validation: Host has connectivity to the majority of hosts in the cluster
INFO Host max3.ocp.example.com: updated status from insufficient to known (Host is ready to be installed)
INFO Preparing cluster for installation
INFO Cluster validation: All hosts in the cluster are ready to install.
INFO Host max3.ocp.example.com: updated status from known to preparing-for-installation (Host finished successfully to prepare for installation)
INFO Host max1.ocp.example.com: New image status quay.io/openshift-release-dev/ocp-v4.0-art-dev@sha256:a0fac1616598bda78643c7351837d412f822d49adc20b8f9940490f080310c92. result: success. time: 8.93 seconds; size: 411.27 Megabytes; download rate: 48.31 MBps
INFO Host max1.ocp.example.com: updated status from preparing-for-installation to preparing-successful (Host finished successfully to prepare for installation)
INFO Host max2.ocp.example.com: New image status quay.io/openshift-release-dev/ocp-v4.0-art-dev@sha256:a0fac1616598bda78643c7351837d412f822d49adc20b8f9940490f080310c92. result: success. time: 7.68 seconds; size: 411.27 Megabytes; download rate: 56.14 MBps
INFO Host max2.ocp.example.com: updated status from preparing-for-installation to preparing-successful (Host finished successfully to prepare for installation)
INFO Host max3.ocp.example.com: updated status from preparing-for-installation to preparing-successful (Host finished successfully to prepare for installation)
INFO Cluster installation in progress
INFO Host max3.ocp.example.com: updated status from preparing-successful to installing (Installation is in progress)
INFO Host: max2.ocp.example.com, reached installation stage Starting installation: master
INFO Host: max1.ocp.example.com, reached installation stage Installing: master
INFO Host: max2.ocp.example.com, reached installation stage Writing image to disk: 5%

INFO Host: max3.ocp.example.com, reached installation stage Writing image to disk: 100%
INFO Bootstrap Kube API Initialized
INFO Host: max1.ocp.example.com, reached installation stage Waiting for control plane: Waiting for masters to join bootstrap control plane
INFO Host: max2.ocp.example.com, reached installation stage Rebooting
INFO Host: max2.ocp.example.com, reached installation stage Configuring
INFO Host: max3.ocp.example.com, reached installation stage Rebooting
INFO Host: max3.ocp.example.com, reached installation stage Configuring
INFO Host: max3.ocp.example.com, reached installation stage Joined
INFO Host: max1.ocp.example.com, reached installation stage Waiting for bootkube
INFO Host: max3.ocp.example.com, reached installation stage Done
INFO Host: max1.ocp.example.com, reached installation stage Waiting for bootkube: waiting for ETCD bootstrap to be complete
INFO Bootstrap configMap status is complete
INFO Bootstrap is complete
INFO cluster bootstrap is complete

When bootstrap is completed …

Run the following command to wait for the installation to be completed.

$ ./openshift-install --dir demo agent wait-for install-complete

Now you can sit back and wait for it to complete.

[root@bastion ~]# ./openshift-install --dir demo agent wait-for install-complete
INFO Cluster installation in progress
WARNING Host max1.ocp.example.com validation: Host couldn't synchronize with any NTP server
INFO Host: max1.ocp.example.com, reached installation stage Waiting for controller: waiting for controller pod ready event
INFO Bootstrap Kube API Initialized
INFO Bootstrap configMap status is complete
INFO Bootstrap is complete
INFO cluster bootstrap is complete
INFO Cluster is installed
INFO Install complete!
INFO To access the cluster as the system:admin user when using 'oc', run
INFO export KUBECONFIG=/root/demo/auth/kubeconfig
INFO Access the OpenShift web-console here: https://console-openshift-console.apps.demo.ocp.example.com
INFO Login to the console with user: "kubeadmin", and password: "xxxxx-xxxxx-xxxxx-xxxxx"

Congratulations to me! I have successfully completed the installation.

Reference:
