Lesson learned from the last test (https://shanna-chan.blog/2019/07/26/openshift4-vsphere-static-ip/), and I got questions around clarification on using static IP. My apologies for the confusion from my last test since it was my test without any real documentation. I want to record all my errors so I can help others to troubleshoot.
Anyway, I decided to retest the installation of OCP 4.3 using static IP. The goal to clarify the installation instructions my last note from the last blog if you are trying to install OCP4 on the VMware environment manually using static IP.
Environment:

- OCP 4.3.5
- vSphere 6.7
List of VMs:
- Bootstrap 192.168.1.110
- Master0 192.168.1.111
- Master1 192.168.1.112
- Master2 192.168.1.113
- Worker0 192.168.1.114
- Worker1 192.168.1.115
Prerequisites:
The following components are already running in my test environment.
DNS Server
- Add Zone /etc/named.conf. An example can be found here https://github.com/christianh814/openshift-toolbox/blob/master/ocp4_upi/docs/0.prereqs.md#dns
- Configures the zone files for all the DNS entries. An example configuration is shown below.
; The api points to the IP of your load balancer
api.ocp43	IN	A	192.168.1.72
api-int.ocp43	IN	A	192.168.1.72
;
; The wildcard also points to the load balancer
*.apps.ocp43	IN	A	192.168.1.72
;
; Create entry for the bootstrap host
bootstrap0.ocp43	IN	A	192.168.1.110
;
; Create entries for the master hosts
master01.ocp43	IN	A	192.168.1.111
master02.ocp43	IN	A	192.168.1.112
master03.ocp43	IN	A	192.168.1.113
;
; Create entries for the worker hosts
worker01.ocp43	IN	A	192.168.1.114
worker02.ocp43	IN	A	192.168.1.115
;
; The ETCd cluster lives on the masters...so point these to the IP of the masters
etcd-0.ocp43	IN	A	192.168.1.111
etcd-1.ocp43	IN	A	192.168.1.112
etcd-2.ocp43	IN	A	192.168.1.113
;
; The SRV records are IMPORTANT....make sure you get these right...note the trailing dot at the end...
_etcd-server-ssl._tcp.ocp43	IN	SRV	0 10 2380 etcd-0.ocp43.example.com.
_etcd-server-ssl._tcp.ocp43	IN	SRV	0 10 2380 etcd-1.ocp43.example.com.
_etcd-server-ssl._tcp.ocp43	IN	SRV	0 10 2380 etcd-2.ocp43.example.com.
Load balancer
- Update /etc/haproxy/haproxy.cfg with cluster information. An example is shown below.
#---------------------------------------------------------------------

listen stats
    bind *:9000
    mode http
    stats enable
    stats uri /
    monitor-uri /healthz

#---------------------------------------------------------------------
#Cluster ocp43 - static ip test
frontend openshift-api-server
    bind *:6443
    default_backend openshift-api-server
    mode tcp
    option tcplog

backend openshift-api-server
    balance source
    mode tcp
    #server bootstrap0.ocp43.example.com 192.168.1.110:6443 check
    server master01.ocp43.example.com 192.168.1.111:6443 check
    server master02.ocp43.example.com 192.168.1.112:6443 check
    server master03.ocp43.example.com 192.168.1.113:6443 check

frontend machine-config-server
    bind *:22623
    default_backend machine-config-server
    mode tcp
    option tcplog

backend machine-config-server
    balance source
    mode tcp
    # server bootstrap0.ocp43.example.com 192.168.1.110:22623 check
    server master01.ocp43.example.com 192.168.1.111:22623 check
    server master02.ocp43.example.com 192.168.1.112:22623 check
    server master03.ocp43.example.com 192.168.1.113:22623 check

frontend ingress-http
    bind *:80
    default_backend ingress-http
    mode tcp
    option tcplog

backend ingress-http
    balance source
    mode tcp
    server worker01.ocp43.example.com 192.168.1.114:80 check
    server worker02.ocp43.example.com 192.168.1.115:80 check

frontend ingress-https
    bind *:443
    default_backend ingress-https
    mode tcp
    option tcplog

backend ingress-https
    balance source
    mode tcp
    server worker01.ocp43.example.com 192.168.1.114:443 check
    server worker02.ocp43.example.com 192.168.1.115:443 check
Web Server
- Configure a web server. In my example, I configure httpd on an RHEL VM.
yum -y install httpd
systemctl enable --now httpd
firewall-cmd --add-service=8080/tcp --permanent
firewall-cmd --reload
Installation downloads
- From https://mirror.openshift.com/pub/openshift-v4/clients/ocp/4.3.5/
- openshift-install-mac-4.3.5.tar.gz
- openshift-client-mac-4.3.5.tar.gz
- From https://mirror.openshift.com/pub/openshift-v4/dependencies/rhcos/4.3/latest/
- rhcos-4.3.0-x86_64-installer.iso
- rhcos-4.3.0-x86_64-metal.raw.gz
Installation Using Static IP address
Prepare installation
- Generate SSH key:
$ ssh-keygen -t rsa -b 4096 -N '' -f ~/.ssh/vsphere-ocp43
- Start ssh-agent:
$ eval "$(ssh-agent -s)"
- Add ssh private key to the ssh-agent:
$ ssh-add ~/.ssh/vsphere-ocp43
Identity added: /Users/shannachan/.ssh/vsphere-ocp43 (shannachan@MacBook-Pro)
- Download & extract OpenShift Installer:
wget https://mirror.openshift.com/pub/openshift-v4/clients/ocp/4.3.5/openshift-install-mac-4.3.5.tar.gz
tar zxvf openshift-install-mac-4.3.5.tar.gz
- Download & extract OpenShift CLI:
wget wget https://mirror.openshift.com/pub/openshift-v4/clients/ocp/4.3.5/openshift-client-mac-4.3.5.tar.gz
tar zxvf openshift-client-mac-4.3.5.tar.gz
- Copy or download the pull secret from cloud.redhat.com
- Go to cloud.redhat.com
- Login with your credential (create an account if you don’t have one)
- Click “Create Cluster”
- Click OpenShift Container Platform
- Scroll down and click “VMware vSphere”
- Click on “Download Pull Secret” to download the secret
Create Installation manifests and ignition files
- Create an installation directory:
mkdir ocp43
- Create `install-config.yaml` as shown below.
apiVersion: v1 baseDomain: example.com compute: - name: worker replicas: 0 controlPlane: hyperthreading: Enabled name: master replicas: 3 metadata: name: ocp43 platform: vsphere: vcenter: 192.168.1.200 username: vsphereadmin password: xxxx datacenter: Datacenter defaultDatastore: datastore3T pullSecret: '<copy your pull secret here>' sshKey: '<copy your public key here>' - Backup install-config.yaml and copy it into the installation directory
- Generate Kubernetes manifests for the cluster:
$./openshift-install create manifests --dir=./ocp43
INFO Consuming Install Config from target directory
WARNING Making control-plane schedulable by setting MastersSchedulable to true for Scheduler cluster settings
- Modify <installation directory>/manifests/cluster-scheduler-02-config.yml
- Update mastersSchedulable to
false - Obtain Ignition files:
$ ./openshift-install create ignition-configs --dir=./ocp43
INFO Consuming Common Manifests from target directory
INFO Consuming Worker Machines from target directory
INFO Consuming Master Machines from target directory
INFO Consuming OpenShift Install (Manifests) from target directory
INFO Consuming Openshift Manifests from target directory
- Files that were created:
$ tree ocp43
ocp43
├── auth
│   ├── kubeadmin-password
│   └── kubeconfig
├── bootstrap.ign
├── master.ign
├── metadata.json
└── worker.ign
Upload files to the webserver
- Upload the rhcos-4.3.0-x86_64-metal.raw.gz to web server location
- Upload all the ignition files to the webserver location
- Update the file permission on the *.ign files on the webserver:
chmod 644 *.ign
Note: check and make sure that you can download the ignition files and gz file for the webserver.
Custom ISO
Create all custom ISO files with the parameters that you need for each VMs. This step can skip if you plan to type all the kernel parameters by hand when prompt.
- Download rhcos-4.3.0-x86_64-installer.iso and rhcos-4.3.0-x86_64-metal.raw.gz
- Extract ISO to a temporary location:
sudo mount rhcos-410.8.20190425.1-installer.iso /mnt/
mkdir /tmp/rhcos
rsync -a /mnt/* /tmp/rhcos/
cd /tmp/rhcos
vi isolinux/isolinux.cfg
- Modify the boot entry similar to this:
label linux
  menu label ^Install RHEL CoreOS
  kernel /images/vmlinuz
  append initrd=/images/initramfs.img nomodeset rd.neednet=1 coreos.inst=yes ip=192.168.1.110::192.168.1.1:255.255.255.0:bootstrap0.ocp43.example.com:ens192:none nameserver=192.168.1.188 coreos.inst.install_dev=sda coreos.inst.image_url=http://192.168.1.230:8080/rhcos-4.3.0-x86_64-metal.raw.gz coreos.inst.ignition_url=http://192.168.1.230:8080/bootstrap.ign
where:
ip=<ip address of the VM>::<gateway>:<netmask>:<hostname of the VM>:<interface>:none
nameserver=<DNS>
coreos.inst.image_url=http://<webserver host:port>/rhcos-4.3.0-x86_64-metal.raw.gz
coreos.inst.ignition_url=http://<webserver host:port>/<bootstrap, master or worker ignition>.ign
- Create new ISO as /tmp/rhcos_install.iso:
sudo mkisofs -U -A "RHCOS-x86_64" -V "RHCOS-x86_64" -volset "RHCOS-x86_64" -J -joliet-long -r -v -T -x ./lost+found -o /tmp/rhcos_install.iso -b isolinux/isolinux.bin -c isolinux/boot.cat -no-emul-boot -boot-load-size 4 -boot-info-table -eltorito-alt-boot -e images/efiboot.img -no-emul-boot .
- Upload all the custom ISOs to the datastore for VM creation via vCenter
- You will repeat the steps for all VMs with the specific IP and ign file. You only need to create individual VM for the cluster if you don’t want to type the kernel parameters at the prompt when installing via the ISO. I would recommend that since it actually takes less time to do that than typing the kernel parameters each time.
Create VM using custom ISO
- Create a resource folder
- Action -> New folder -> New VM or Template folder
- I normally give the name as the cluster id
- Create VM with 4 CPU and 16 RAM
- Action -> New Virtual Machine
- Select
Create New Virtual Machine-> click Next - Add name
- Select the VM folder -> Next
- Select datacenter -> Next
- Select storage -> Next
- Use ESXi 6.7 -> Next
- Select Linux and RHEL 7 -> Next
- Use these parameters:
- CPU: 4
- Memory: 16 (Reserve all guest memory)
- 120 GB disk
- Select the corresponding ISO from Datastore and check “connect”
- VMOption -> advantage -> Edit configuration -> Add configuration Params -> Add “disk.EnableUUID”: Specify TRUE
- Click OK
- Click Next
- Click Finish
- Power on the bootstrap, masters and workers VMs as the steps below
- Go the VM console:
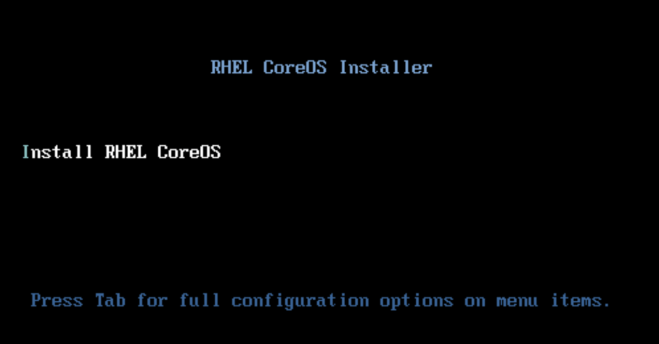
- Hit Enter
- You should see the login screen once the VM boots successfully

- repeat on all servers and make sure the specific ISO for the given VM is used.
Tips: you can clone the existing VM and just modify the ISO files for VM creation.
Creating Cluster
- Monitor the cluster:
./openshift-install --dir=<installation_directory> wait-for bootstrap-complete --log-level=info
INFO Waiting up to 30m0s for the Kubernetes API at https://api.ocp43.example.com:6443...
INFO API v1.16.2 up
INFO Waiting up to 30m0s for bootstrapping to complete...
INFO It is now safe to remove the bootstrap resources
- From the bootstrap VM, similar log messages are shown:
$ ssh -i ~/.ssh/vsphere-ocp43 core@bootstrap-vm
$ journalctl -b -f -u bootkube.service
...
Mar 16 20:03:57 bootstrap0.ocp43.example.com bootkube.sh[2816]: Tearing down temporary bootstrap control plane...
Mar 16 20:03:57 bootstrap0.ocp43.example.com podman[18629]: 2020-03-16 20:03:57.232567868 +0000 UTC m=+726.128069883 container died 695412d7eece5a9bd099aac5b6bc6a8d412c8037b14391ff54ee33132ebce0e1 (image=quay.io/openshift-release-dev/ocp-v4.0-art-dev@sha256:222fbfd3323ec347babbda1a66929019221fcee82cfc324a173b39b218cf6c4b, name=zen_lamarr)
Mar 16 20:03:57 bootstrap0.ocp43.example.com podman[18629]: 2020-03-16 20:03:57.379721836 +0000 UTC m=+726.275223886 container remove 695412d7eece5a9bd099aac5b6bc6a8d412c8037b14391ff54ee33132ebce0e1 (image=quay.io/openshift-release-dev/ocp-v4.0-art-dev@sha256:222fbfd3323ec347babbda1a66929019221fcee82cfc324a173b39b218cf6c4b, name=zen_lamarr)
Mar 16 20:03:57 bootstrap0.ocp43.example.com bootkube.sh[2816]: bootkube.service complete
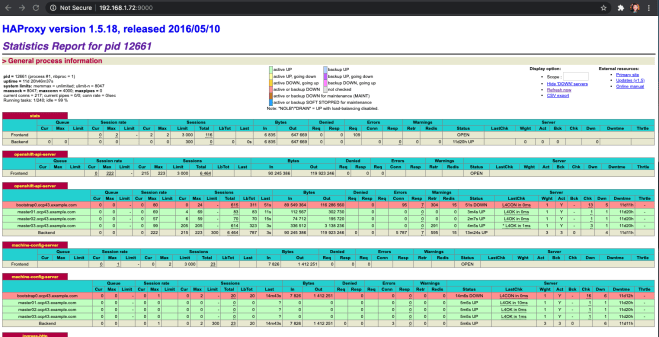
- Load balancer status
- Remove the bootstrap from the Load Balancer. You can check the status of LB from the status page
Logging in to the Cluster
- Export the kubeadmiin credentials:
export KUBECONFIG=./ocp43/auth/kubeconfig
- Verify cluster role via oc CLI
$ oc whoami
system:admin
- Approving the CSRs
$ oc get nodes
NAME                         STATUS   ROLES    AGE   VERSION
master01.ocp43.example.com   Ready    master   60m   v1.16.2
master02.ocp43.example.com   Ready    master   60m   v1.16.2
master03.ocp43.example.com   Ready    master   60m   v1.16.2
worker01.ocp43.example.com   Ready    worker   52m   v1.16.2
worker02.ocp43.example.com   Ready    worker   51m   v1.16.2

$ oc get csr
NAME        AGE   REQUESTOR                                                                   CONDITION
csr-66l6l   60m   system:node:master02.ocp43.example.com                                      Approved,Issued
csr-8r2dc   52m   system:serviceaccount:openshift-machine-config-operator:node-bootstrapper   Approved,Issued
csr-hvt2d   51m   system:node:worker02.ocp43.example.com                                      Approved,Issued
csr-k2ggg   60m   system:node:master03.ocp43.example.com                                      Approved,Issued
csr-kg72s   52m   system:serviceaccount:openshift-machine-config-operator:node-bootstrapper   Approved,Issued
csr-qvbg2   60m   system:serviceaccount:openshift-machine-config-operator:node-bootstrapper   Approved,Issued
csr-rtncq   52m   system:node:worker01.ocp43.example.com                                      Approved,Issued
csr-tsfxx   60m   system:serviceaccount:openshift-machine-config-operator:node-bootstrapper   Approved,Issued
csr-wn7rp   60m   system:serviceaccount:openshift-machine-config-operator:node-bootstrapper   Approved,Issued
csr-zl87q   60m   system:node:master01.ocp43.example.com                                      Approved,Issued
- If there is
pendingCSR, approve the CSR via the command below.oc adm certificate approve <csr_name>
- Validate the cluster components all available:
$ oc get co
NAME                                       VERSION   AVAILABLE   PROGRESSING   DEGRADED   SINCE
authentication                             4.3.5     True        False         False      41m
cloud-credential                           4.3.5     True        False         False      63m
cluster-autoscaler                         4.3.5     True        False         False      47m
console                                    4.3.5     True        False         False      43m
dns                                        4.3.5     True        False         False      54m
image-registry                             4.3.5     True        False         False      49m
ingress                                    4.3.5     True        False         False      48m
insights                                   4.3.5     True        False         False      58m
kube-apiserver                             4.3.5     True        False         False      53m
kube-controller-manager                    4.3.5     True        False         False      54m
kube-scheduler                             4.3.5     True        False         False      54m
machine-api                                4.3.5     True        False         False      55m
machine-config                             4.3.5     True        False         False      55m
marketplace                                4.3.5     True        False         False      48m
monitoring                                 4.3.5     True        False         False      42m
network                                    4.3.5     True        False         False      59m
node-tuning                                4.3.5     True        False         False      50m
openshift-apiserver                        4.3.5     True        False         False      51m
openshift-controller-manager               4.3.5     True        False         False      55m
openshift-samples                          4.3.5     True        False         False      46m
operator-lifecycle-manager                 4.3.5     True        False         False      55m
operator-lifecycle-manager-catalog         4.3.5     True        False         False      55m
operator-lifecycle-manager-packageserver   4.3.5     True        False         False      51m
service-ca                                 4.3.5     True        False         False      58m
service-catalog-apiserver                  4.3.5     True        False         False      50m
service-catalog-controller-manager         4.3.5     True        False         False      50m
storage                                    4.3.5     True        False         False      49m
Configure the Image Registry to use ephemeral storage for now.
I will update the image registry in the other blog since I want to focus on the completion of the installation.
To set emptyDir for the image registry:
oc patch configs.imageregistry.operator.openshift.io cluster --type merge --patch '{"spec":{"storage":{"emptyDir":{}}}}'
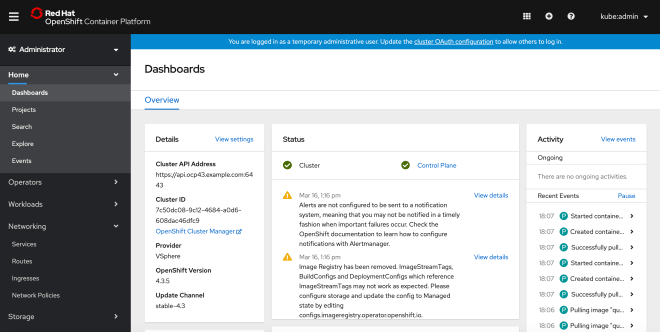
Completing the installation:
$ ./openshift-install --dir=./ocp43 wait-for install-complete
INFO Waiting up to 30m0s for the cluster at https://api.ocp43.example.com:6443 to initialize...
INFO Waiting up to 10m0s for the openshift-console route to be created...
INFO Install complete!
INFO To access the cluster as the system:admin user when using 'oc', run 'export KUBECONFIG=/Users/shannachan/projects/ocp4.3/ocp43/auth/kubeconfig'
INFO Access the OpenShift web-console here: https://console-openshift-console.apps.ocp43.example.com
INFO Login to the console with user: kubeadmin, password: xxxxxxxxxxxxxx
Congratulation Cluster is up!
Troubleshoot tips:
Access any server via the command below:
ssh -i ~/.ssh/vsphere-ocp43 core@vm-server
Reference:

Excellent document Shanna…it was very useful ..Thx a lot..Ciao..Mario
LikeLike
You are welcome! Happy to share!
LikeLike