There are many ways to install OCP4. One of the most common ask is how to install OCP4 with the static IP address on the vSphere environment. This is one of the use cases that I want to test out and hope I can share my lessons learned.
Environment:
- vSphere 6.7 Update2
- Run install from macOS Mojave 10.14.5
Requirements:
- No DHCP server
- Need to use static IP addresses
Problems I had:
Error #1: Dracut: FATAL: Sorry, ‘ip=dhcp’ does not make sense for multiple interface configurations.

Cause:
When I tried to overwrite the IP address by setting the kernel parameters using ip=<ip>::<gateway>:<net mask>:<FQDN>:<interface>:none with cloning from OVA.
Solution:
Setting the IP parameter before the initramfs is created from the rhcos-install.iso instead of from OVA.
Here are steps to create custom ISO with the parameters to simplify the process. You can use the downloaded ISO, but it will be a lot of typing, so the following steps are very useful when creating many VMs from the ISO.
- Download the rhcos-4.1.0-x86_64-installer.iso and rhcos-4.1.0-x86_64-metal-bios.raw.gz from https://mirror.openshift.com/pub/openshift-v4/dependencies/rhcos/4.1/latest/
- Extract the ISO to a temporary location:
sudo mount rhcos-410.8.20190425.1-installer.iso /mnt/
mkdir /tmp/rhcos
rsync -a /mnt/* /tmp/rhcos/
cd /tmp/rhcos
vi isolinux/isolinux.cfg
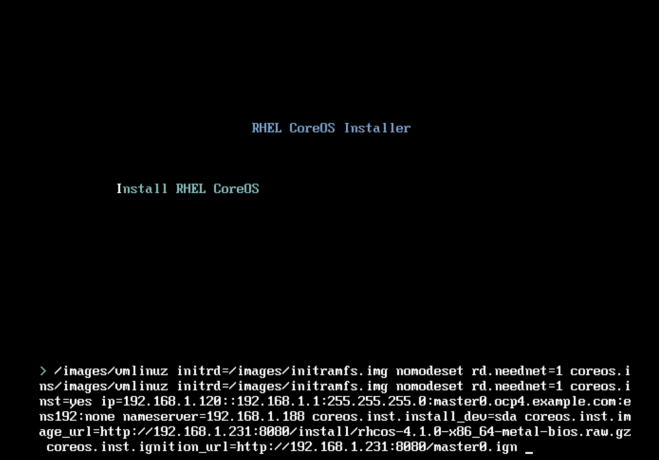
- Modify the boot entry at the end of the file similar to this:
label linux
  menu label ^Install RHEL CoreOS
  kernel /images/vmlinuz
  append initrd=/images/initramfs.img nomodeset rd.neednet=1 coreos.inst=yes ip=192.168.1.124::192.168.1.1:255.255.255.0:bootstrap.ocp4.example.com:ens192:none nameserver=192.168.1.188 coreos.inst.install_dev=sda coreos.inst.image_url=http://192.168.1.231:8080/rhcos-4.1.0-x86_64-metal-bios.raw.gz coreos.inst.ignition_url=http://192.168.1.231:8080/static.ign
where:
ip=<ip address>::<gateway>:<netmask>:<hostname>:<interface>:none
nameserver=<DNS>
coreos.inst.image_url=http://<webserver host:port>/rhcos-4.1.0-x86_64-metal-bios.raw.gz
coreos.inst.ignition_url=http://<webserver host:port>/<master or worker ignition>.ign
- Create new ISO as /tmp/rhcos_install.iso
sudo mkisofs -U -A "RHCOS-x86_64" -V "RHCOS-x86_64" -volset "RHCOS-x86_64" -J -joliet-long -r -v -T -x ./lost+found -o /tmp/rhcos_install.iso -b isolinux/isolinux.bin -c isolinux/boot.cat -no-emul-boot -boot-load-size 4 -boot-info-table -eltorito-alt-boot -e images/efiboot.img -no-emul-boot .
- Update the custom ISO to the datastore for VM creation.
Error #2: No such host

Cause:
Most likely the network did not set up correctly when the master or worker start.
Solution:
In my case, this is an issue when creating masters/workers from an OVA and network configuration did not get setup when the RHCOS is booted.
Error #3: Getting EOF from LB

Cause:
Most likely the DNS and webserver configuration errors.
Solution:
Make sure all FQDN resolve to the correct IPs and restart related services.
Error #4: X509 cert error

Cause:
The reason in my case was the clocks on all servers were not synced and required to regenerate my SSH key.
Solution:
NTP was setup on DNS and webserver and make sure the clock is synced across. I also regenerate the SSH and update my install-config.yaml file.
Prerequisites:
- DNS
- Loadbalancer
- Webserver
- NTP
- CoreOS Config Transpiler (filetranspiler): https://github.com/ashcrow/filetranspiler
The above components are required in my setup. I used the link [3] in the Reference section to setup DNS, load balancer, and webserver. I configured NTP on my DNS, webserver, load balancer and make sure I configure the time on my ESXi server as well. The filetranspiler is an awesome tool for manipulating the ignition files. I used it thought out the test here.
Preparing the infrastructure:
I started my installation with OCP 4 official documentation for vSphere (Reference [1] below).
- SSH keygen
Captured my example steps here. Please use your own value.
ssh-keygen -t rsa -b 4096 -N '' -f ~/.ssh/ocp4vsphere
eval "$(ssh-agent -s)"
ssh-add ~/.ssh/ocp4vsphere
- Download OpenShift 4 installer
- extract it
- chmod +x openshift-installer
- mv to /usr/local/bin directory
wget https://mirror.openshift.com/pub/openshift-v4/clients/ocp/latest/openshift-install-mac-4.1.7.tar.gz
- Download pull secret
- Go to cloud.redhat.com
- Login with your credential (create an account if you don’t have one)
- Click “Create Cluster” –> “VMware vSphere”
- Click on “Download Pull Secret” to download the secret
- Create an installation directory
- Create install-config.yaml
- https://docs.openshift.com/container-platform/4.1/installing/installing_vsphere/installing-vsphere.html#installation-vsphere-config-yaml_installing-vsphere
- backup your install-config.yaml
- copy install-config.yaml to the <installation directory>
apiVersion: v1
baseDomain: example.com
compute:
- hyperthreading: Enabled
  name: worker
  replicas: 0
controlPlane:
  hyperthreading: Enabled
  name: master
  replicas: 3
metadata:
  name: ocp4
platform:
  vsphere:
    vcenter: <vCenter host>
    username: <administrator>
    password: <password>
    datacenter: dc
    defaultDatastore: datastore
pullSecret: '<your pull seceret>'
sshKey: '<your public ssh key>'
- Create ignition files
openshift-install create ignition-configs --dir=<installation_directory>
- Prepare for creating bootstrap with hostname and the static IP
- Download filetranspiler:
-
git clone https://github.com/ashcrow/filetranspiler
-
- Copy <installation_directory>/bootstrap.ign to <filetranspile_directory>/
- Create bootstrap hostname file:
echo "bootstrap.ocp4.example.com" > hostname - move hostname file to <filetranspile_directory>/bootstrap/etc/
- Create ifcfg-ens192 file under
<filetranspile_directory>/bootstrap/etc/sysconfig/network-scripts with following content
NAME=ens192
DEVICE=ens192
TYPE=Ethernet
BOOTPROTO=none
ONBOOT=yes
IPADDR=<bootstrap IP address>
NETMASK=<netmask>
GATEWAY=<gateway>
DOMAIN=example.com
DNS1=<dns>
PREFIX=24
DEFROUTE=yes
IPV6INIT=no
- Run this command to create new boostrap ignition file:
cd <filetranspile_directory>
./filetranspile -i bootstrap.ign -f bootstrap -o bootstrap-static.ign
- Upload bootstrap-static.ign to the webserver:
scp bootstrap-static.ign user@<webserverip>:/var/www/html/bootstrap.ign - Create an append-bootstrap.ign. Example as shown below.
{
  "ignition": {
    "config": {
      "append": [
        {
          "source": "http://<webserverip:port>/bootstrap.ign",
          "verification": {}
        }
      ]
    },
    "timeouts": {},
    "version": "2.1.0"
  },
  "networkd": {},
  "passwd": {},
  "storage": {},
  "systemd": {}
}
- Encode the append-bootstrap.ign file.
openssl base64 -A -in append-bootstrap.ign -out append-bootstrap.64
- Download filetranspiler:
- Upload OVA to the vSphere datastore
- Download OVA from https://mirror.openshift.com/pub/openshift-v4/dependencies/rhcos/4.1/latest/rhcos-4.1.0-x86_64-vmware.ova
- Upload the OVA to datastore from vCenter
- In the vSphere Client, create a template for the OVA image
- Create a bootstrap VM using the steps here:
- Use step #7 from https://docs.openshift.com/container-platform/4.1/installing/installing_vsphere/installing-vsphere.html#installation-vsphere-machines_installing-vsphere
- Use content in append-bootstrap.64 for the value of guestinfo.ignition.config.data
- Create custom ISO with master0 static IP by following Error#1 solution
- Use adding the following parameters to create rhcos-install.iso for master0:
coreos.inst.install_dev=sda coreos.inst.image_url=http://192.168.1.231:8080/install/rhcos-4.1.0-x86_64-metal-bios.raw.gz coreos.inst.ignition_url=http://192.168.1.231:8080/master0.ign ip=192.168.1.120::192.168.1.1:255.255.255.0:master0.ocp4.example.com:ens192:none nameserver=192.168.1.188 - Upload the custom rhcos-install.iso to webserver.
- Use adding the following parameters to create rhcos-install.iso for master0:
- Create master0 ignition file using the same steps as creating bootstrap ignition file
- Create master0 hostname file under <filetranspile_directory>/bootstrap/etc/
- Create ifcfg-ens192 for master0 under <filetranspile_directory>/bootstrap/etc/sysconfig/network-scripts/ifcfg-ens192
- Create master0 ignition file with static ip info:
./filetranspile -i master.ign -f bootstrap -o master0-static.ign
-
- Upload master0-static.ign to the webserver:
scp master0-static.ign user@<webserverip>:/var/www/html/master0.ign- Note that master0.ign is used in the kernel parameter when installing the ISO.
- Create VM from the custom ISO
- Create VM with 4 CPU and 16 RAM
- Select the custom ISO
- add “disk.EnableUUID”: Specify TRUE under VM Options and Edit Configuration.
- Power on the VM
- Go the VM console:

- Hit <Tab>
- you can modify the parameters per each server here.
- Hit <enter>
- The server will reboot after installation.
- Upload master0-static.ign to the webserver:
- Repeat for all masters and workers.
Installation:
- When you have all the VMs created, run the following command.
$ openshift-install --dir=ocp4 wait-for bootstrap-complete --log-level debug

DEBUG OpenShift Installer v4.1.7-201907171753-dirty
DEBUG Built from commit 5175a461235612ac64d576aae09939764ac1845d
INFO Waiting up to 30m0s for the Kubernetes API at https://api.ocp4.example.com:6443...
INFO API v1.13.4+3a25c9b up
INFO Waiting up to 30m0s for bootstrapping to complete...
DEBUG Bootstrap status: complete
INFO It is now safe to remove the bootstrap resources
Verification
- Log in:
$ export KUBECONFIG=ocp4/auth/kubeconfig
$ oc whoami

$ oc get nodes
NAME                       STATUS   ROLES    AGE     VERSION
master0.ocp4.example.com   Ready    master   35m     v1.13.4+205da2b4a
master1.ocp4.example.com   Ready    master   35m     v1.13.4+205da2b4a
master2.ocp4.example.com   Ready    master   35m     v1.13.4+205da2b4a
worker0.ocp4.example.com   Ready    worker   20m     v1.13.4+205da2b4a
worker1.ocp4.example.com   Ready    worker   11m     v1.13.4+205da2b4a
worker2.ocp4.example.com   Ready    worker   5m25s   v1.13.4+205da2b4a
- Validate all CSR is approved
$ oc get csr

NAME        AGE     REQUESTOR                                                                   CONDITION
csr-6vqqn   35m     system:node:master1.ocp4.example.com                                        Approved,Issued
csr-7hlkk   20m     system:node:worker0.ocp4.example.com                                        Approved,Issued
csr-9p6sw   11m     system:serviceaccount:openshift-machine-config-operator:node-bootstrapper   Approved,Issued
csr-b4cst   35m     system:serviceaccount:openshift-machine-config-operator:node-bootstrapper   Approved,Issued
csr-gx4dz   5m33s   system:node:worker2.ocp4.example.com                                        Approved,Issued
csr-kqcfv   11m     system:serviceaccount:openshift-machine-config-operator:node-bootstrapper   Approved,Issued
csr-lh5zg   35m     system:serviceaccount:openshift-machine-config-operator:node-bootstrapper   Approved,Issued
csr-m2hvl   35m     system:node:master0.ocp4.example.com                                        Approved,Issued
csr-npb4l   35m     system:node:master2.ocp4.example.com                                        Approved,Issued
csr-rdpgm   20m     system:serviceaccount:openshift-machine-config-operator:node-bootstrapper   Approved,Issued
csr-s2d7z   11m     system:node:worker1.ocp4.example.com                                        Approved,Issued
csr-sx2r5   6m      system:serviceaccount:openshift-machine-config-operator:node-bootstrapper   Approved,Issued
csr-tvgbq   35m     system:serviceaccount:openshift-machine-config-operator:node-bootstrapper   Approved,Issued
csr-vvp2h   6m11s   system:serviceaccount:openshift-machine-config-operator:node-bootstrapper   Approved,Issued
- Patching the images registry for non-production environment
$oc project openshift-image-registry
$oc patch configs.imageregistry.operator.openshift.io cluster --type merge --patch '{"spec":{"storage":{"emptyDir":{}}}}'
config.imageregistry.operator.openshift.io/cluster patched
Next step?
To improve the process, we need to automate this.
Reference:
[1] OpenShift 4 Official Installation Documentation for vSphere