There are many documents out there on the OpenShift Compliance Operator. I share this with customers who want to learn how to work with OpenShift Operator and helped them to get started on the OpenShift Compliance Operator.
In this blog, I will walk you through how to generate the OpenSCAP evaluation report using the OpenShift Compliance Operator.
OpenShift Compliance Operator can be easily installed on OpenShift 4 as a security feature with the OpenShift Container Platform. The Compliance Operator uses OpenSCAP, a NIST-certified tool, to scan and enforce security policies provided by the content.
Prerequisites
- An OpenShift 4 cluster
- Compliance Operator installed
Overview
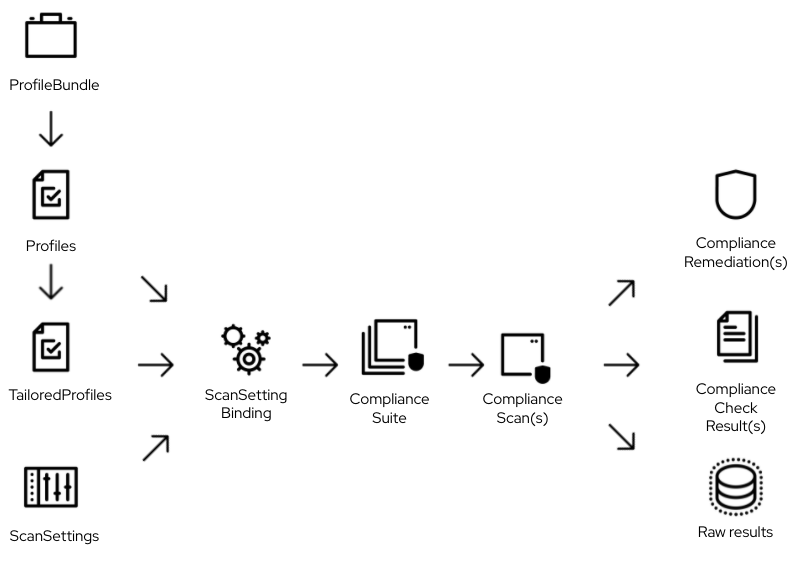
The compliance operator uses many custom resources. The diagram below helps me to understand the relationship between all the resources. In addition, the OpenShift documentation has details about the Compliance Operator custom resources.
Steps to Generate OpenSCAP Evaluation Report
Some default custom resources come as part of the compliance operator installation, such as ProfileBunble, Profiles, and ScanSetting.
First, we need to create the ScanSettingBinding, which defines the Profiles and the ScanSetting. The ScanSettingBinding tells Compliance Operator to evaluate for Profile(s) A with the specific scan setting.
- Log in OpenShift Cluster
# oc login -u <username> https://api.<clusterid>.<subdomain>
- Assuming you have already installed the OpenShift Compliance Operator. Next, check the access to the OpenShift Compliance project using the command shown below.
# oc project openshift-compliance
- The default compliance profiles will be available once the operator is installed. The command below lists out all compliance profiles Custom Resource Definition (CRD) profiles.compliance.openshift.io.
# oc get profiles.compliance.openshift.io
- To get custom resource ScanSetting via the below command. It shows two default scan settings.
# oc get ScanSetting
NAME                 AGE
default              2d10h
default-auto-apply   2d10h
- Check out the “default” ScanSetting
Name:         default
Namespace:    openshift-compliance
Labels:       <none>
Annotations:  <none>
API Version:  compliance.openshift.io/v1alpha1
Kind:         ScanSetting
Metadata:
  Creation Timestamp:  2021-10-19T16:22:18Z
  Generation:          1
  Managed Fields:
...
  Resource Version:  776981
  UID:               f453726d-665a-432e-88a9-a4ad60176ac7
Raw Result Storage:
  Pv Access Modes:
    ReadWriteOnce
  Rotation:  3
  Size:      1Gi
Roles:
  worker
  master
Scan Tolerations:
  Effect:    NoSchedule
  Key:       node-role.kubernetes.io/master
  Operator:  Exists
Schedule:    0 1 * * *
Events:      <none>
- Create ScanSettingBinding as shown in scan-setting-binding-example.yaml below.
# cat scan-setting-binding-example.yaml
apiVersion: compliance.openshift.io/v1alpha1
kind: ScanSettingBinding
metadata:
  name: cis-compliance
profiles:
  - name: ocp4-cis-node
    kind: Profile
    apiGroup: compliance.openshift.io/v1alpha1
  - name: ocp4-cis
    kind: Profile
    apiGroup: compliance.openshift.io/v1alpha1
settingsRef:
  name: default
  kind: ScanSetting
  apiGroup: compliance.openshift.io/v1alpha1
- Create the above sample ScanSettingBinding custom resource.
# oc create -f scan-setting-binding-example.yaml
- Verify the creation of the ScanSettingBinding
# oc get scansettingbinding
- Custom resource ComplianceSuites is to help tracking the state of the scans. The following command is to check the state of the scan you defined in your ScanSettingBinding.
# oc get compliancesuite
NAME             PHASE     RESULT
cis-compliance   RUNNING   NOT-AVAILABLE
- ComplianceScan custom resource needs all the parameters to run OpenSCAP, such as profile id, image to get the content from, and data stream file path. It also can constain operational parameter.
# oc get compliancescan
NAME                   PHASE   RESULT
ocp4-cis               DONE    NON-COMPLIANT
- While the custom resource ComplianceCheckResult shows the aggregate result of the scan, it is useful to review the raw result from the scanner. The raw results are produced in the ARF format and can be large. Therefore, Compliance Operator creates a persistent volume (PV) for the raw result from the scan. Let’s take a look if the PVC is created for the scan.
# oc get pvc
NAME                   STATUS   VOLUME                                     CAPACITY   ACCESS MODES   STORAGECLASS   AGE
ocp4-cis               Bound    pvc-5ee57b02-2f6b-4997-a45c-3c4df254099d   1Gi        RWO            gp2            27m
ocp4-cis-node-master   Bound    pvc-57c7c411-fc9f-4a4d-a713-de91c934af1a   1Gi        RWO            gp2            27m
ocp4-cis-node-worker   Bound    pvc-7266404a-6691-4f3d-9762-9e30e50fdadb   1Gi        RWO            gp2            28m
- Once we know the raw result is created, we need the oc-compliance tool to get the raw result XML file. You will need to login to the registry.redhat.io.
# podman login -u <user> registry.redhat.io
- Download the oc-compliance tool
podman run --rm --entrypoint /bin/cat registry.redhat.io/compliance/oc-compliance-rhel8 /usr/bin/oc-compliance > ~/usr/bin/oc-compliance
- Fetch the raw results to a temporary location (/tmp/cis-compliance)
# oc-compliance fetch-raw scansettingbindings cis-compliance -o /tmp/cis-compliance
Fetching results for cis-compliance scans: ocp4-cis-node-worker, ocp4-cis-node-master, ocp4-cis
Fetching raw compliance results for scan 'ocp4-cis-node-worker'.....
The raw compliance results are available in the following directory: /tmp/cis-compliance/ocp4-cis-node-worker
Fetching raw compliance results for scan 'ocp4-cis-node-master'.....
The raw compliance results are available in the following directory: /tmp/cis-compliance/ocp4-cis-node-master
Fetching raw compliance results for scan 'ocp4-cis'...........
The raw compliance results are available in the following directory: /tmp/cis-compliance/ocp4-cis
- Inspect the output filesystem and extract the *.bzip2 file
# cd /tmp/cis-compliance/ocp4-cis
# ls
ocp4-cis-api-checks-pod.xml.bzip2

# bunzip2 -c  ocp4-cis-api-checks-pod.xml.bzip2  > /tmp/cis-compliance/ocp4-cis/ocp4-cis-api-checks-pod.xml

# ls /tmp/cis-compliance/ocp4-cis/ocp4-cis-api-checks-pod.xml
/tmp/cis-compliance/ocp4-cis/ocp4-cis-api-checks-pod.xml
- Convert ARF XML to html
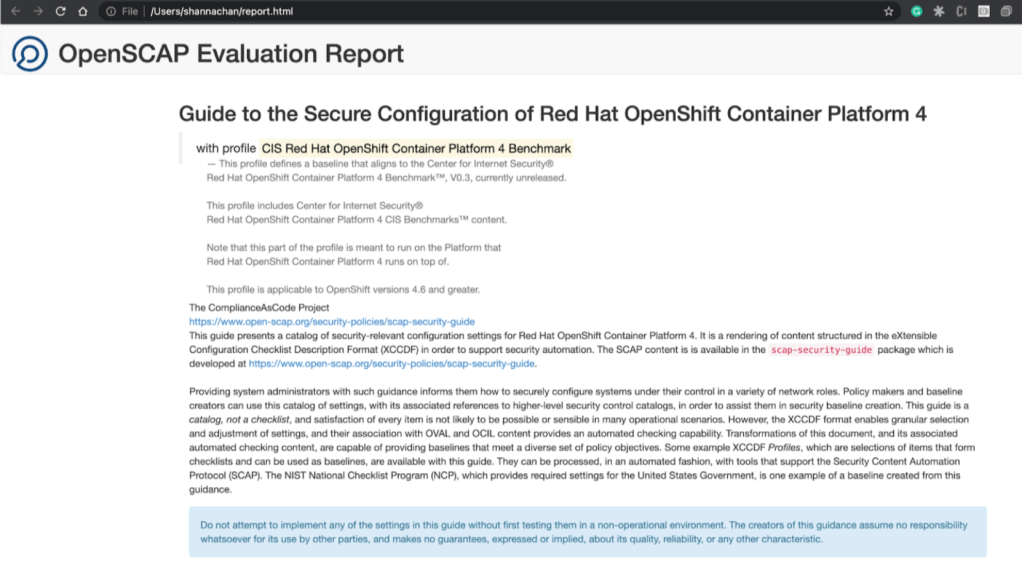
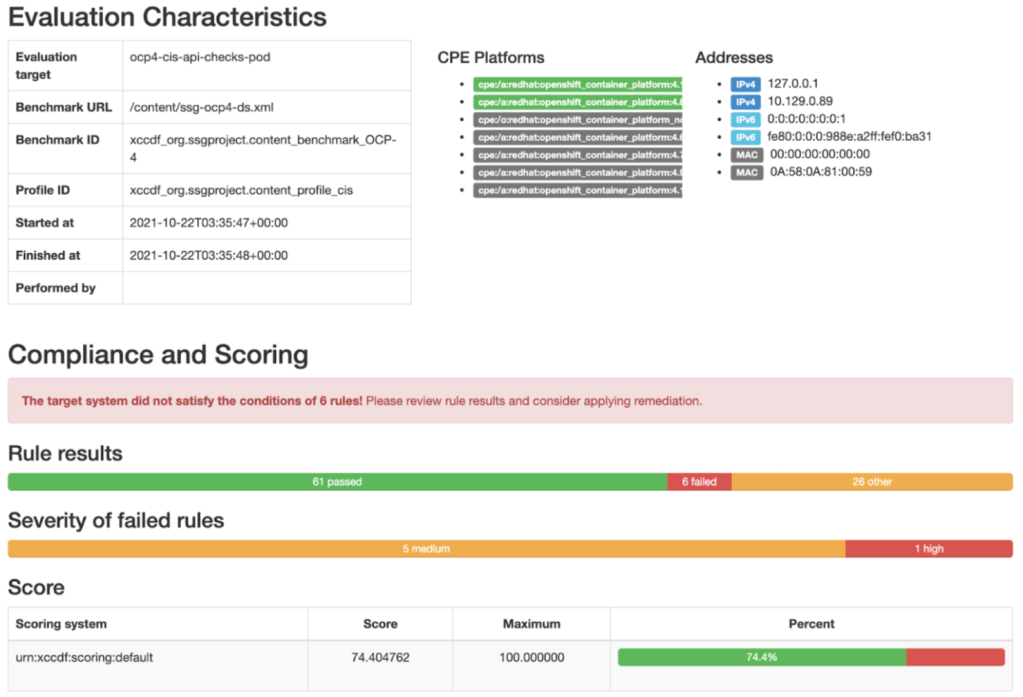
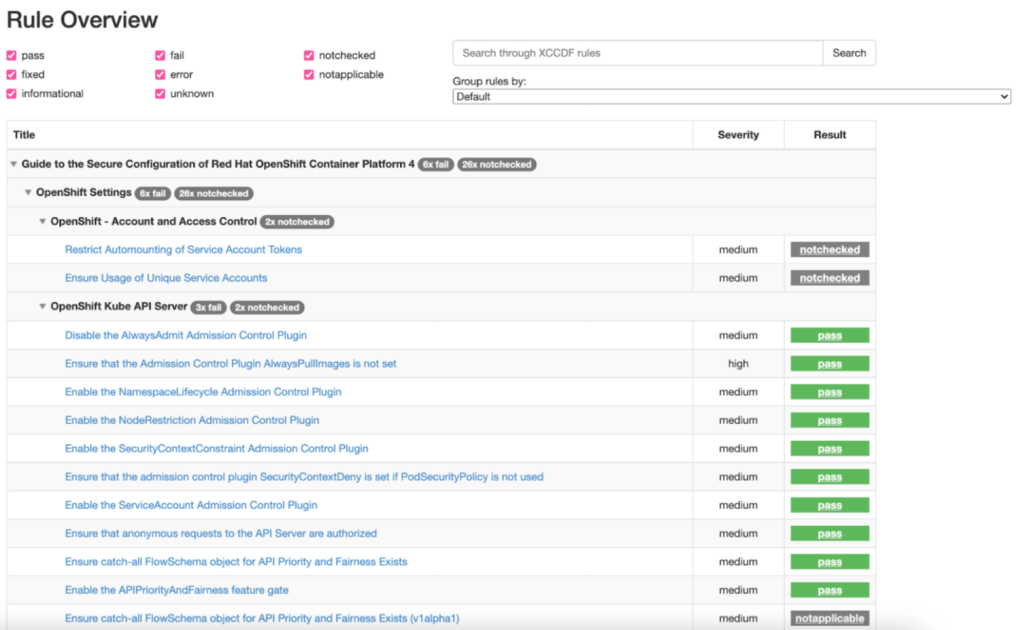
# oscap xccdf generate report ocp4-cis-api-checks-pod.xml > report.html
- View the HTML as shown below.

Reference
Thank you Juan Antonio Osorio Robles for sharing the diagram!

Thank you (again) for a very hands-on helpful blog on how to best use the OpenShift Compliance operator for compliance standards check of cluster nodes etc. As the operator/CRD has quite a few properties to use, the workflow diagram is super helpful as well!
LikeLike
Your document covers details in depth.
LikeLike
Thanks, Shanna, for an excellent and practical “getting started” overview.
LikeLike