OpenShift Agent Installer on bare metal in a restricted environment

My goal for this post is to share my steps for installing OpenShift using Agent Installer in a restricted environment using a mirror registry.

My limitation is that my hardware is ancient 🙂 I used ESXi to simulate the bare metal hosts, but did not use vSphere as the provider for the installation.

My condition for this test:

  • I can only use static IP addresses (no DHCP).
  • RHEL 9 is the provision server with installed nmstatectl, oc CLI, oc mirror, and mirror registry.
  • I used Agent Installer to install 4.16.39, a three-node compact cluster.

High-level preparation steps:

  1. Set up the DNS
  2. Create a cert for the mirror registry
  3. Install mirror registry
  4. Update CA trust on the provision host
  5. Mirror the image from the source (quay.io)
  6. Create agent-config.yaml and install-config.yaml
    • agent-config.yaml must define the NTP servers (of your choice)
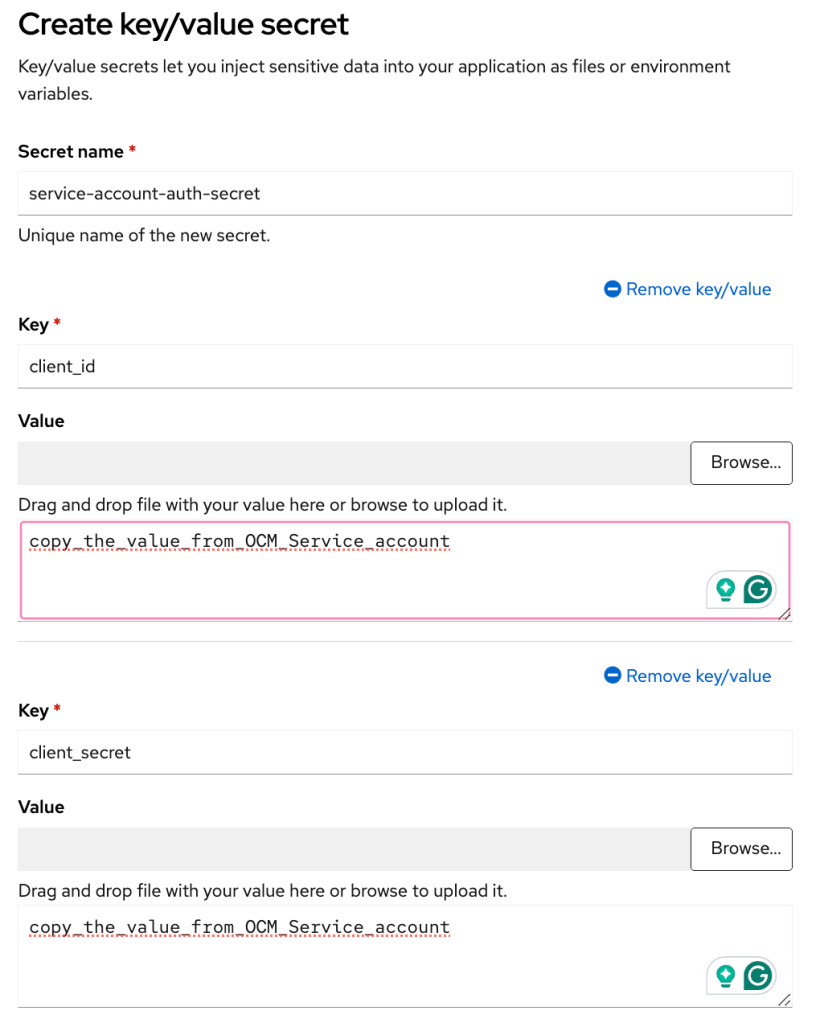
    • install-config.yaml’s pullSecret must include the mirror registry credential and the cert for the mirror registry.

Download links

My example DNS configuration

Install mirror registry

I used the Red Hat mirror registry (Quay). You can also mirror the images using Nexus, Jfrog, or Harbor. Please use the Reference [4] to generate certs.
Run the following command to install the mirror registry.

$ ./mirror-registry -v install --quayHostname bastion.example.com --quayRoot /opt/ocpmirror --initUser admin --initPassword admin123456 --quayStorage /opt/mirrorStorage --sslCert ssl.cert --sslKey ssl.key

Mirror the images

To mirror images using plugin v2, you must have downloaded the ‘oc’ and ‘oc mirror’ plug-ins.

Download pullSecret.txt and update the credentials for your environment.

Please use reference [2] to configure the pullSecret.json. The following commands can be used to validate the pullSecret file.

$podman login --authfile local.json -u $QUAY_USER -p $QUAY_PWD $QUAY_HOST_NAME:$QUAY_PORT --tls-verify=false

$jq -cM -s '{"auths": ( .[0].auths + .[1].auths ) }' local.json ~/pull-secret.txt > pull-secret.json

$podman login --authfile ./pull-secret.json quay.io
$podman login --authfile ./pull-secret.json registry.redhat.io
$podman login --authfile ./pull-secret.json $QUAY_HOST_NAME:$QUAY_PORT

My example imageSetConfiguration file

Run the following command to mirror the images to the mirror registry.

$ oc mirror --config imageSetConfiguration-v2-4.16.39.yaml --authfile /root/mirror-reg/pull-secret.json --workspace file:///opt/working-dir docker://bastion.example.com:8443/ocp4 --v2

Output from the ‘oc mirror’

Configuration files for the installation

  • agent-config.yaml
  • install-config.yaml

My example agent-config.yaml

apiVersion: v1beta1
kind: AgentConfig
metadata:
name: demo
additionalNTPSources:
- time1.google.com
- time2.google.com
rendezvousIP: 192.168.1.121
hosts:
- hostname: max1.ocp.example.com
rootDeviceHints:
deviceName: /dev/sda
interfaces:
- name: ens160
macAddress: 00:0c:29:5e:fe:f3
networkConfig:
interfaces:
- name: ens160
type: ethernet
state: up
mac-address: 00:0c:29:5e:fe:f3
ipv4:
enabled: true
address:
- ip: 192.168.1.121
prefix-length: 23
dhcp: false
dns-resolver:
config:
server:
- 192.168.1.188
routes:
config:
- destination: 0.0.0.0/0
next-hop-address: 192.168.1.188
next-hop-interface: ens160
table-id: 254
- hostname: max2.ocp.example.com
rootDeviceHints:
deviceName: /dev/sda
interfaces:
- name: ens160
macAddress: 00:0c:29:a7:4d:e0
networkConfig:
interfaces:
- name: ens160
type: ethernet
state: up
mac-address: 00:0c:29:a7:4d:e0
ipv4:
enabled: true
address:
- ip: 192.168.1.122
prefix-length: 23
dhcp: false
dns-resolver:
config:
server:
- 192.168.1.188
routes:
config:
- destination: 0.0.0.0/0
next-hop-address: 192.168.1.188
next-hop-interface: ens160
table-id: 254
- hostname: max3.ocp.example.com
rootDeviceHints:
deviceName: /dev/sda
interfaces:
- name: ens160
macAddress: 00:0c:29:59:2e:10
networkConfig:
interfaces:
- name: ens160
type: ethernet
state: up
mac-address: 00:0c:29:59:2e:10
ipv4:
enabled: true
address:
- ip: 192.168.1.123
prefix-length: 23
dhcp: false
dns-resolver:
config:
server:
- 192.168.1.188
routes:
config:
- destination: 0.0.0.0/0
next-hop-address: 192.168.1.188
next-hop-interface: ens160
table-id: 254

My example of install-config.yaml

apiVersion: v1
baseDomain: ocp.example.com
compute:
- name: worker
replicas: 0
controlPlane:
name: master
replicas: 3
metadata:
name: demo
networking:
clusterNetwork:
- cidr: 10.128.0.0/14
hostPrefix: 23
machineNetwork:
- cidr: 192.168.0.0/23
networkType: OVNKubernetes
serviceNetwork:
- 172.30.0.0/16
platform:
baremetal:
hosts:
- name: max1.ocp.example.com
role: master
bootMACAddress: 00:0c:29:5e:fe:f3
- name: max2.ocp.example.com
role: master
bootMACAddress: 00:0c:29:a7:4d:e0
- name: max3.ocp.example.com
role: master
bootMACAddress: 00:0c:29:59:2e:10
apiVIPs:
- 192.168.1.126
ingressVIPs:
- 192.168.1.125
fips: false
pullSecret: '{"auths":{"..."}}}'
sshKey: 'ssh-rsa … root@bastion.example.com'
imageContentSources:
- mirrors:
- bastion.example.com:8443/ocp4/openshift/release-images
source: quay.io/openshift-release-dev/ocp-release
- mirrors:
- bastion.example.com:8443/ocp4/openshift/release
source: quay.io/openshift-release-dev/ocp-v4.0-art-dev
additionalTrustBundle: |
-----BEGIN CERTIFICATE-----

-----END CERTIFICATE-----

Steps that I took before booting up the hosts

  1. I created VMs (bare metal hosts) on my ESXi host. Because I am using an ESXi host, I can get the MAC addresses from the UI.
  2. Add the MAC addresses to the agent-install.yaml
  3. Make a directory. I use ‘demo’ in my example here.
  4. Copy agent-config.yaml and install-config.yaml to the demo directory.
  5. Run the following command to create the ISO from the parent of the demo directory. The command will output agent.x86_64.iso to the demo directory.
$ openshift-install --dir demo agent create image

Now you have to ISO to boot all the hosts

  1. Upload the ISO to the ESXi datastore
  2. Configure all bare metal hosts (VM in my case) to boot with the agent.x86_64.iso
  3. Boot all three hosts in sequence and run the command below.
$./openshift-install --dir demo agent wait-for bootstrap-complete  --log-level=info

You will monitor the status of the bootstrap from the output. (It took a while to complete, as you can see)

[root@bastion ~]# ./openshift-install --dir demo agent create image
WARNING imageContentSources is deprecated, please use ImageDigestSources
INFO Configuration has 3 master replicas and 0 worker replicas
WARNING hosts from install-config.yaml are ignored
WARNING The imageDigestSources configuration in install-config.yaml should have at least one source field matching the releaseImage value bastion.example.com:8443/ocp4/openshift/release-images@sha256:2754cd66072e633063b6bf26446978102f27dd19d4668b20df2c7553ef9ee4cf
WARNING Certificate 2020B78FC3BA75A644FD58F757EFAE86C81FA384 from additionalTrustBundle is x509 v3 but not a certificate authority
INFO The rendezvous host IP (node0 IP) is 192.168.1.121
INFO Extracting base ISO from release payload
INFO Verifying cached file
INFO Using cached Base ISO /root/.cache/agent/image_cache/coreos-x86_64.iso
INFO Consuming Agent Config from target directory
INFO Consuming Install Config from target directory
INFO Generated ISO at demo/agent.x86_64.iso
[root@bastion ~]# ./openshift-install --dir demo agent wait-for bootstrap-complete --log-level=info
INFO Waiting for cluster install to initialize. Sleeping for 30 seconds
INFO Cluster is not ready for install. Check validations

INFO Host max2.ocp.example.com: calculated role is master
INFO Cluster validation: api vips 192.168.1.126 belongs to the Machine CIDR and is not in use.
INFO Cluster validation: ingress vips 192.168.1.125 belongs to the Machine CIDR and is not in use.
INFO Cluster validation: The cluster has the exact amount of dedicated control plane nodes.
INFO Host 946b4d56-fef7-9683-5b01-6405c8592e10: Successfully registered
WARNING Host max1.ocp.example.com validation: No connectivity to the majority of hosts in the cluster
WARNING Host max3.ocp.example.com validation: No connectivity to the majority of hosts in the cluster
WARNING Host max3.ocp.example.com validation: Host couldn't synchronize with any NTP server
WARNING Host max2.ocp.example.com validation: No connectivity to the majority of hosts in the cluster
INFO Host max2.ocp.example.com: calculated role is master
INFO Host max1.ocp.example.com validation: Host has connectivity to the majority of hosts in the cluster
INFO Host max2.ocp.example.com validation: Host has connectivity to the majority of hosts in the cluster
INFO Host max3.ocp.example.com validation: Host has connectivity to the majority of hosts in the cluster
INFO Host max3.ocp.example.com: updated status from insufficient to known (Host is ready to be installed)
INFO Preparing cluster for installation
INFO Cluster validation: All hosts in the cluster are ready to install.
INFO Host max3.ocp.example.com: updated status from known to preparing-for-installation (Host finished successfully to prepare for installation)
INFO Host max1.ocp.example.com: New image status quay.io/openshift-release-dev/ocp-v4.0-art-dev@sha256:a0fac1616598bda78643c7351837d412f822d49adc20b8f9940490f080310c92. result: success. time: 8.93 seconds; size: 411.27 Megabytes; download rate: 48.31 MBps
INFO Host max1.ocp.example.com: updated status from preparing-for-installation to preparing-successful (Host finished successfully to prepare for installation)
INFO Host max2.ocp.example.com: New image status quay.io/openshift-release-dev/ocp-v4.0-art-dev@sha256:a0fac1616598bda78643c7351837d412f822d49adc20b8f9940490f080310c92. result: success. time: 7.68 seconds; size: 411.27 Megabytes; download rate: 56.14 MBps
INFO Host max2.ocp.example.com: updated status from preparing-for-installation to preparing-successful (Host finished successfully to prepare for installation)
INFO Host max3.ocp.example.com: updated status from preparing-for-installation to preparing-successful (Host finished successfully to prepare for installation)
INFO Cluster installation in progress
INFO Host max3.ocp.example.com: updated status from preparing-successful to installing (Installation is in progress)
INFO Host: max2.ocp.example.com, reached installation stage Starting installation: master
INFO Host: max1.ocp.example.com, reached installation stage Installing: master
INFO Host: max2.ocp.example.com, reached installation stage Writing image to disk: 5%

INFO Host: max3.ocp.example.com, reached installation stage Writing image to disk: 100%
INFO Bootstrap Kube API Initialized
INFO Host: max1.ocp.example.com, reached installation stage Waiting for control plane: Waiting for masters to join bootstrap control plane
INFO Host: max2.ocp.example.com, reached installation stage Rebooting
INFO Host: max2.ocp.example.com, reached installation stage Configuring
INFO Host: max3.ocp.example.com, reached installation stage Rebooting
INFO Host: max3.ocp.example.com, reached installation stage Configuring
INFO Host: max3.ocp.example.com, reached installation stage Joined
INFO Host: max1.ocp.example.com, reached installation stage Waiting for bootkube
INFO Host: max3.ocp.example.com, reached installation stage Done
INFO Host: max1.ocp.example.com, reached installation stage Waiting for bootkube: waiting for ETCD bootstrap to be complete
INFO Bootstrap configMap status is complete
INFO Bootstrap is complete
INFO cluster bootstrap is complete

When bootstrap is completed …

Run the following command to wait for the installation to be completed.

$ ./openshift-install --dir demo agent wait-for install-complete

Now you can sit back and wait for it to complete.

[root@bastion ~]# ./openshift-install --dir demo agent wait-for install-complete
INFO Cluster installation in progress
WARNING Host max1.ocp.example.com validation: Host couldn't synchronize with any NTP server
INFO Host: max1.ocp.example.com, reached installation stage Waiting for controller: waiting for controller pod ready event
INFO Bootstrap Kube API Initialized
INFO Bootstrap configMap status is complete
INFO Bootstrap is complete
INFO cluster bootstrap is complete
INFO Cluster is installed
INFO Install complete!
INFO To access the cluster as the system:admin user when using 'oc', run
INFO export KUBECONFIG=/root/demo/auth/kubeconfig
INFO Access the OpenShift web-console here: https://console-openshift-console.apps.demo.ocp.example.com
INFO Login to the console with user: "kubeadmin", and password: "xxxxx-xxxxx-xxxxx-xxxxx"

Congratulations to me! I have successfully completed the installation.

Reference:

ROSA HCP Cost management

I tried to trace the cost for ROSA HCP service from the AWS console and thought I could just get the report from the AWS billing feature. However, the Cost Explorer did not provide the ROSA HCP charges from the AWS console.

I am setting up the OpenShift Cost Management Operator and exploring if I can get the necessary information.

Step to set up Cost Management Operator

  • Log in to the OpenShift Console as an administrator
  • Go to Operators under the left menu and click OperatorHub, click on Cost Management Metrics Operator
  • Click “Install”
  • Take the default value and click “Install.”
  • Wait for the Operator to completed the installation
  • Go to Operators under the left menu and click Installed Operators
  • The “Cost Management Metrics Operator” should be on the list, and click on it
  • Click “Create instance”
  • The YAML view for the CostManagementMetricsConfig under the project costmanagement-metrics-operator, update the source in the YAML with “create_source: true” and a name for the source.
  • Click “Create.”

Set up on the Red Hat Hybrid Cloud Console

  • Once you log into the Red Hat Hybrid Cloud Console (OCM), you will find the integration setting as shown below.
  • Click integration. The source name was added to the cost management operator CR should show up here under the “Red Hat” tab.
  • Click Integration Setting and select Service Accounts
  • Click “Create service account” and enter the name & description of service account.
  • Click “Create.”
  • Copy the “client id” and “client secret.”
  • Under “User Access” on the left menu, select “Groups.”
  • Click on the group with cost management roles -> click the “Service accounts” tab -> click “Add service account.”
  • Select the newly created service account from the last step -> click “Add to group.”

Update the Cost Management CR with the service account

  • Log in to the OpenShift Console as an administrator
  • Create a secret for the service account we created in the last step.
  • Will need to use the copied “client_id” and “client_secret” from the service account.
  • Under the project “costmanagement-metrics-operator, click create -> select Key/Value secret
  • Add the values for “client_id” and “client_secret” and click “Create.”
  • Go to Operators under the left menu and click Installed Operators
  • Click “Cost Management Metrics Operator” -> Click “Cost Management Metic Config” tab -> click the CMMC CR
  • Under the YAML view, update the value of the secret_name and type under “authentication” section. The name of the secret matches the name of the secret you created in the previous step.
  • Click “Save.”
  • Use OCP CLI to run this command:
$ oc label namespace costmanagement-metrics-operator insights_cost_management_optimizations='true' 
  • Go back to OCM console -> Red Hat OpenShift service -> cost management.
  • I can filter the view per cluster under Cost Management -> OpenShift using group by “Cluster.” Below is a view of a cluster
  • Click “Cost Explorer” under “Cost Management” on the menu -> select “Amazon Web Service filtered by OpenShift” under Perspective and select “Group by cluster”

The terminology “filtered by OpenShift” describes the portion of the cloud provider’s cost associated with running an OpenShift cluster. When both a cloud provider and OpenShift source have been added with matching tags or resource ids in the cost reports, Cost Management can correlate the two reports to calculate how much of your cloud provider cost is related to running OpenShift.

Reference:

Running Virtual Machine on ROSA HCP

Out of curiosity, I want to see if I can run a virtual machine on my ROSA HCP cluster.

Create ROSA HCP

OCP 4.16.2 is now available on ROSA HCP. I created ROSA HCP cluster 4.16.2 for this test. Since I am following the ROSA documentation to create the ROSA HCP cluster, I share my commands here on how I create the cluster for this test. Please refer to the “Reference” section for the details.

$ rosa create account-roles --hosted-cp
$ export ACCOUNT_ROLES_PREFIX=ManagedOpenShift
$ rosa create oidc-config --mode=auto --yes
$ export OIDC_ID=xxxxxxxx
$ export OPERATOR_ROLES_PREFIX=demo
$ rosa create operator-roles --hosted-cp --prefix=$OPERATOR_ROLES_PREFIX --oidc-config-id=$OIDC_ID --installer-role-arn arn:aws:iam::${AWS_ACCOUNT_ID}:role/${ACCOUNT_ROLES_PREFIX}-HCP-ROSA-Installer-Role
$ rosa create cluster --sts --oidc-config-id 2ci6ntk6g92bq7qm21pvhfff1fp07li1 --operator-roles-prefix demo --hosted-cp --subnet-ids $SUBNET_IDS

After my cluster installation completes, log into Red Hat Hybrid Cloud Console to configure access for the cluster.

  • Click on the cluster name -> click on the “Access control” tab -> select htpasswd as the IDP to add a user
  • Click Add after entering the user information
  • Click “Add user” to add a cluster-admin as shown below
  • Go to the Network tab -> click “open console” and log in to the ROSA HCP cluster.

Install OpenShift Virtualization Operator

  • Once you log in as cluster admin to the OpenShift console -> Click Operators -> OperatorHub -> click OpenShift Virtualization -> Click “Install”
  • Click the “Installed Operators” on the left nav -> make sure the status show as “Succeed” for OpenShift Virtualization Operator.
  • Click “OpenShift Virtualization” -> OpenShift Virtualization Deployment -> Create HyperConverged CR using the YAML as shown below.
apiVersion: hco.kubevirt.io/v1beta1
kind: HyperConverged
metadata:
name: kubevirt-hyperconverged
namespace: openshift-cnv
annotations:
deployOVS: "false"
labels:
app: kubevirt-hyperconverged
spec:
applicationAwareConfig:
allowApplicationAwareClusterResourceQuota: false
vmiCalcConfigName: DedicatedVirtualResources
certConfig:
ca:
duration: 48h0m0s
renewBefore: 24h0m0s
server:
duration: 24h0m0s
renewBefore: 12h0m0s
evictionStrategy: LiveMigrate
featureGates:
alignCPUs: false
autoResourceLimits: false
deployKubeSecondaryDNS: false
deployTektonTaskResources: false
deployVmConsoleProxy: false
disableMDevConfiguration: false
enableApplicationAwareQuota: false
enableCommonBootImageImport: true
enableManagedTenantQuota: false
nonRoot: true
persistentReservation: false
withHostPassthroughCPU: false
infra: {}
liveMigrationConfig:
allowAutoConverge: false
allowPostCopy: false
completionTimeoutPerGiB: 800
parallelMigrationsPerCluster: 5
parallelOutboundMigrationsPerNode: 2
progressTimeout: 150
resourceRequirements:
vmiCPUAllocationRatio: 10
uninstallStrategy: BlockUninstallIfWorkloadsExist
virtualMachineOptions:
disableFreePageReporting: false
disableSerialConsoleLog: true
workloadUpdateStrategy:
batchEvictionInterval: 1m0s
batchEvictionSize: 10
workloadUpdateMethods:
- LiveMigrate
workloads: {}

Create Bare Metal MachinePool (with IMDSv2)

  • Enter a name, select the subnet, select m5zn.metal as the instance type, and add a label (type=metal). You will need to use the same label when creating VMs in the later step.

Making sure the bare metal EC2 instance is up

When the machine pool was first created, I saw the metal node was terminated. I enabled the IMDSv2 on the metal node, and the node can start.

Update Notes (09/2024): using ROSA CLI 1.2.43+, you can use ROSA CLI to create the machine pool with the flag --ec2-metadata-http-tokens=required. Then you will enable IMDSv2 at the creation. An Example of the command to create a machine pool via ROSA CLI is shown below.

rosa create machinepool --cluster=rosa-hcp --name=virt-mp   --replicas=1  --instance-type=m5zn.metal --ec2-metadata-http-tokens=required

Create a VM

Once the bare metal node is up, and the OpenShift virtualization operator is installed and configured successfully. You are ready to create a VM.

  • Go to the OpenShift console, select “Overview” under Virtualization on the left menu -> click “Create VirtualMachine”
  • Create a new project and give a new of your project
  • Click “Template catalog” -> Fedora VM
  • Click “Customize VirtualMachine”

  • Click YAML tab and add nodeSelector with Label “type: metal”
  • Click “Create VirtualMachine”
  • The VirtualMachine should be in running in a few minutes.

Reference:

Red Hat OpenShift on Amazon (ROSA) is GA!

I have previously blogged about the pre-GA ROSA, and now it is GA. I decided to write up my GA experience on ROSA.

Let’s get started here.

Enable ROSA on AWS

After logging into AWS, enter openshift in the search box on the top of the page.

Click on the “Red Hat OpenShift Service on AWS” Service listed.

It will then take you to a page as shown below and click to enable the OpenShift service.

Once it is complete, it will show Service enabled.

Click to download the CLI and click on the OS where you run your ROSA CLI. It will start downloading to your local drive.

Set up ROSA CLI

Extract the downloaded CLI file and rosa add to your local path.

tar zxf rosa-macosx.tar.gz
mv rosa /usr/local/bin/rosa

Setting AWS Account

I have set up my AWS account as my IAM user account with proper access per the documentation. There is more information about the account access requirements for ROSA. It is available here.

I have configured my AWS key and secret in my .aws/credentials.

Create Cluster

Verify AWS account access.

rosa verify permissions

Returns:

I: Validating SCP policies...
I: AWS SCP policies ok

Verify the quota for the AWS account.

rosa verify quota --region=us-west-2

Returns:

I: Validating AWS quota...
I: AWS quota ok

Obtain Offline Access Token from the management portal cloud.redhat.com (if you don’t have one yet) by clicking Create One Now link

Go to https://cloud.redhat.com/openshift/token/rosa, and you will have to log in and prompt to accept terms as shown below.

Click View Terms and Conditions.

Check the box to agree the terms and click Submit.

Copy the token from cloud.redhat.com.

rosa login --token=<your cloud.redhat.com token>

Returns:

I: Logged in as 'your_username' on 'https://api.openshift.com'

Verify the login

rosa whoami

Returns:

AWS Account ID:               ############
AWS Default Region:           us-west-2
AWS ARN:                      arn:aws:iam::############:user/username
OCM API:                      https://api.openshift.com
OCM Account ID:               xxxxxyyyyyzzzzzwwwwwxxxxxx
OCM Account Name:             User Name
OCM Account Username:         User Name
OCM Account Email:            name@email.com
OCM Organization ID:          xxxxxyyyyyzzzzzwwwwwxxxxxx
OCM Organization Name:        company name
OCM Organization External ID: 11111111

Configure account and make sure everyone setup correctly

rosa init

Returns

I: Logged in as 'your_username' on 'https://api.openshift.com'
I: Validating AWS credentials...
I: AWS credentials are valid!
I: Validating SCP policies...
I: AWS SCP policies ok
I: Validating AWS quota...
I: AWS quota ok
I: Ensuring cluster administrator user 'osdCcsAdmin'...
I: Admin user 'osdCcsAdmin' already exists!
I: Validating SCP policies for 'osdCcsAdmin'...
I: AWS SCP policies ok
I: Validating cluster creation...
I: Cluster creation valid
I: Verifying whether OpenShift command-line tool is available...
I: Current OpenShift Client Version: 4.7.2

Creating cluster using interactive mode.

rosa create cluster -i
I: Interactive mode enabled.
Any optional fields can be left empty and a default will be selected.
? Cluster name: [? for help] 

Enter the name of the ROSA cluster.

? Multiple availability zones (optional): [? for help] (y/N) 

Enter y/N.

? AWS region:  [Use arrows to move, type to filter, ? for more help]
  eu-west-2
  eu-west-3
  sa-east-1
  us-east-1
  us-east-2
  us-west-1
> us-west-2 

Select the AWS region and hit <enter>.

? OpenShift version:  [Use arrows to move, type to filter, ? for more help]
> 4.7.2
  4.7.1
  4.7.0
  4.6.8
  4.6.6
  4.6.4
  4.6.3

Select the version and hit <enter>.

? Install into an existing VPC (optional): [? for help] (y/N)

Enter y/N.

? Compute nodes instance type (optional):  [Use arrows to move, type to filter, ? for more help]
> r5.xlarge
  m5.xlarge
  c5.2xlarge
  m5.2xlarge
  r5.2xlarge
  c5.4xlarge
  m5.4xlarge

Select the type and hit <enter>.

? Enable autoscaling (optional): [? for help] (y/N)

Enter y/N.

? Compute nodes: [? for help] (2)

Enter the numbers of workers to start.

? Machine CIDR: [? for help] (10.0.0.0/16)

Enter the machine CIDR or use default.

? Service CIDR: [? for help] (172.30.0.0/16)

Enter the service CIDR or use default.

? Pod CIDR: [? for help] (10.128.0.0/14)

Enter the pod CIDR or use default.

? Host prefix: [? for help] (23)

Enter the host prefix or use default

? Private cluster (optional): (y/N) 

Enter y/N.

Note:

Restrict master API endpoint and application routes to direct, private connectivity. You will not be able to access your cluster until you edit network settings in your cloud provider. I also learned that you would need one private subnet and one public subnet for each AZ for your existing private VPC for the GA version of ROSA. There will be more improvement to provide for the private cluster in the future release.

Returns:

I: Creating cluster 'rosa-c1'
I: To create this cluster again in the future, you can run:
   rosa create cluster --cluster-name rosa-c1 --region us-west-2 --version 4.7.2 --compute-nodes 2 --machine-cidr 10.0.0.0/16 --service-cidr 172.30.0.0/16 --pod-cidr 10.128.0.0/14 --host-prefix 23
I: To view a list of clusters and their status, run 'rosa list clusters'
I: Cluster 'rosa-c1' has been created.
I: Once the cluster is installed you will need to add an Identity Provider before you can login into the cluster. See 'rosa create idp --help' for more information.
I: To determine when your cluster is Ready, run 'rosa describe cluster -c rosa-c1'.
I: To watch your cluster installation logs, run 'rosa logs install -c rosa-c1 --watch'.
Name:                       rosa-c1
ID:                         xxxxxxxxxxyyyyyyyyyyyaxxxxxxxxx
External ID:
OpenShift Version:
Channel Group:              stable
DNS:                        rosa-c1.xxxx.p1.openshiftapps.com
AWS Account:                xxxxxxxxxxxx
API URL:
Console URL:
Region:                     us-west-2
Multi-AZ:                   false
Nodes:
 - Master:                  3
 - Infra:                   2
 - Compute:                 2 (m5.xlarge)
Network:
 - Service CIDR:            172.30.0.0/16
 - Machine CIDR:            10.0.0.0/16
 - Pod CIDR:                10.128.0.0/14
 - Host Prefix:             /23
State:                      pending (Preparing account)
Private:                    No
Created:                    Mar 30 2021 03:10:25 UTC
Details Page:               https://cloud.redhat.com/openshift/details/xxxxxxxxxxyyyyyyyyyyyaxxxxxxxxx
 

Copy the URL from the Details Page to the browser and click view logs to see the status of the installation.

When ROSA is completed, you will see the similar page as below.

You will need to access the OpenShift cluster.

Configure Quick Access

Add cluster-admin user

rosa create admin -c rosa-c1

Returns:

I: Admin account has been added to cluster 'rosa-c1'.
I: Please securely store this generated password. If you lose this password you can delete and recreate the cluster admin user.
I: To login, run the following command:

   oc login https://api.rosa-c1.xxxx.p1.openshiftapps.com:6443 --username cluster-admin --password xxxxx-xxxxx-xxxxx-xxxxx

I: It may take up to a minute for the account to become active.

Test user access

$ oc login https://api.rosa-c1.xxxx.p1.openshiftapps.com:6443 --username cluster-admin --password xxxxx-xxxxx-xxxxx-xxxxx
Login successful.

You have access to 86 projects, the list has been suppressed. You can list all projects with 'oc projects'

Using project "default".

Configure Identity Provider

There are options for identity providers. I am using Github in this example.

I am not going to explain how to get identity to provide set up here. I did that in last blog. I will walk through the step to configure ROSA using Github.

rosa create idp --cluster=rosa-c1 -i
I: Interactive mode enabled.
Any optional fields can be left empty and a default will be selected.
? Type of identity provider:  [Use arrows to move, type to filter]
> github
  gitlab
  google
  ldap
  openid

Select one IDP

? Identity provider name: [? for help] (github-1)

Enter the name of the IDP configured on the ROSA

? Restrict to members of:  [Use arrows to move, type to filter, ? for more help]
> organizations
  teams

Select organizations

? GitHub organizations:

Enter the name of the organization. My example is `sc-rosa-idp`

? To use GitHub as an identity provider, you must first register the application:
  - Open the following URL:
    https://github.com/organizations/sc-rosa-idp/settings/applications/new?oauth_application%5Bcallback_url%5D=https%3A%2F%2Foauth-openshift.apps.rosa-c1.0z3w.p1.openshiftapps.com%2Foauth2callback%2Fgithub-1&oauth_application%5Bname%5D=rosa-c1&oauth_application%5Burl%5D=https%3A%2F%2Fconsole-openshift-console.apps.rosa-c1.0z3w.p1.openshiftapps.com
  - Click on 'Register application'

Open a browser and use the above URL to register the application and cope client ID

? Client ID: [? for help] 

Enter the copied Client ID

? Client Secret: [? for help]

Enter client secret from the registered application.

? GitHub Enterprise Hostname (optional): [? for help] 

Hit <enter>

? Mapping method:  [Use arrows to move, type to filter, ? for more help]
  add
> claim
  generate
  lookup

Select claim

I: Configuring IDP for cluster 'rosa-c1'
I: Identity Provider 'github-1' has been created.
   It will take up to 1 minute for this configuration to be enabled.
   To add cluster administrators, see 'rosa create user --help'.
   To login into the console, open https://console-openshift-console.apps.rosa-c1.xxxx.p1.openshiftapps.com and click on github-1.

Congratulation! IDP configuration is completed.

Login in with IDP account

Open a browser with the URL from the IDP configuration. Our example is: https://console-openshift-console.apps.rosa-c1.xxxx.p1.openshiftapps.com.

Click github-1

Click Authorize sc-rosa-idp

Overall, it is straightforward to get started on creating a ROSA cluster on AWS. I hope this will help you in some ways.

Reference

Red Hat OpenShift on Amazon Documentation

Running ROSA on an Existing Private VPC

Pre-GA ROSA test